
The popular advice is simple: buy a bright golf cart lights kit, bolt it on, and your cart is ready for the road. That advice skips the two problems that cause the most trouble in real installations. A light kit can drain a battery pack while the lamps appear to be off, and bright LEDs can still fail to satisfy the equipment requirements for a street-legal low-speed vehicle.
A dependable installation starts with the cart's electrical system and intended use, not the appearance of the lamps. You need the correct voltage conversion, a protected wiring layout, a power source that shuts down properly, and a compliance checklist tied to the jurisdiction where the cart will operate.
Table of Contents
- Street Legal Requirements and LSV Compliance
- The Safety Case for Comprehensive Lighting
- Voltage Reducers and Electrical Compatibility
- Wiring Routing and Weatherproofing Techniques
- Preventing Parasitic Battery Drain
- Final Verification and Functional Testing
Street Legal Requirements and LSV Compliance
A bright headlamp improves visibility, but brightness alone doesn't establish legal status. A standard golf cart, a cart equipped for private-property driving, and a federally classified low-speed vehicle can look similar while carrying different equipment and operating rules.
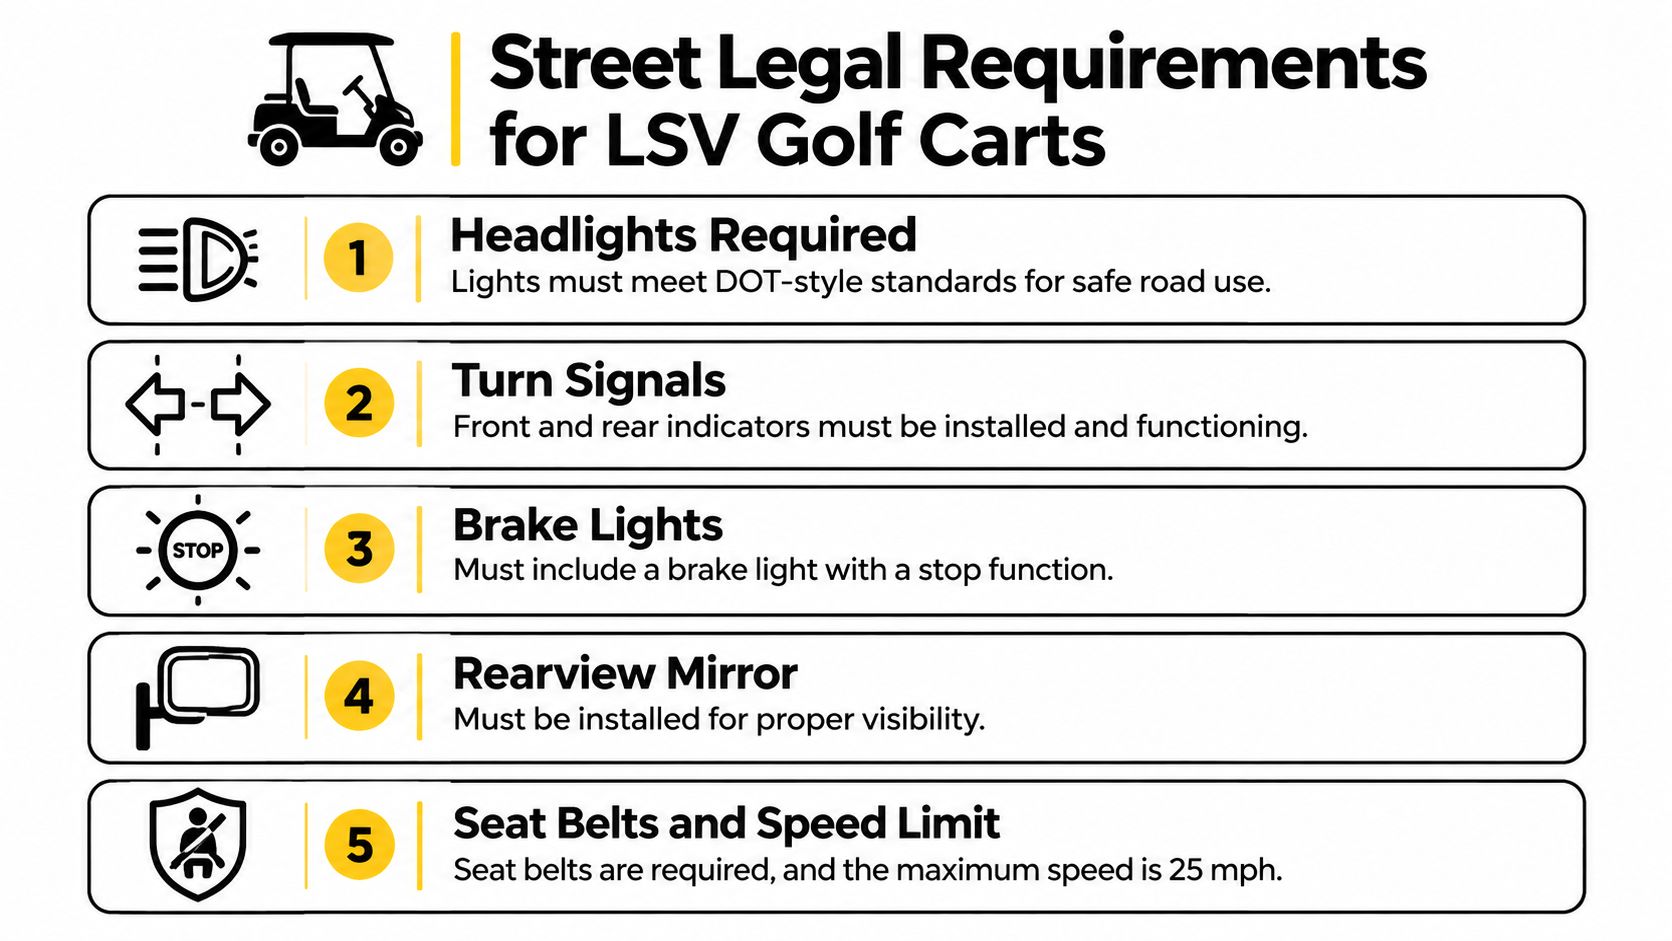
Florida provides a useful benchmark. Its current LSV requirements specify headlamps, front and rear turn signals, stop lamps, tail lamps, and red reflex reflectors on both sides and the rear. The same framework limits LSV operation to streets with posted speed limits of 35 mph or less. Review the Florida Highway Safety and Motor Vehicles LSV requirements before treating any lighting package as road-compliant.
Separate visibility from compliance
A golf-course lighting setup may provide enough illumination for a private path without providing every lamp and reflector required on a public road. Decorative underbody lighting has a different purpose again. It may help a cart stand out at a resort or event, but it doesn't replace a stop lamp, directional indicator, or red reflex reflector.
The federal LSV framework described in a 1998 Florida Senate report identifies a broader safety package that includes headlamps, stop lamps, tail lamps, reflectors, parking brakes, mirrors, windshields, and seat belts. The exact legal treatment depends on the vehicle classification and the applicable state and local rules.
Practical rule: Treat “street legal” as a classification and inspection question, not a lighting style.
Before buying, identify the cart's legal category and the roads where it will operate. Then map each required function to a physical component. Confirm that the kit has front and rear indicators where required, a brake-triggered stop function, tail lamps, and the correct reflectors. A kit that includes only headlights and tail lamps may be useful, but it shouldn't be represented as a complete LSV package.
For a more detailed planning reference, review Solana EV's low-speed vehicle requirements and then verify the rules with the relevant state, county, municipality, or inspection authority. Local governments can impose additional restrictions, so equipment that works in one community may not satisfy another.
The Safety Case for Comprehensive Lighting
The safety argument for a golf cart lights kit isn't limited to seeing the path ahead. Other drivers, cyclists, pedestrians, and passengers need to understand what the cart is doing. Headlights show presence and illuminate hazards, while tail lamps, brake lamps, turn signals, and reflectors communicate movement and position.
Golf-cart use expanded beyond private courses into neighborhoods, resorts, campuses, and public-road environments. During that broader period of use, a study reported a 132% increase in golf-cart-related injuries from 1990 through 2006, with an estimated 148,000 injuries across that period. The figures are summarized in the available golf-cart injury overview. They don't prove that inadequate lighting caused those injuries, and they don't show that a lighting kit alone prevents them. They do show why visibility equipment belongs in a wider safety conversation.
Lighting supports an integrated safety system
The most common injury mechanism in the cited summary was falling or jumping from a moving cart. Other mechanisms included rollovers, collisions with vehicles or stationary objects, and pedestrians being struck or run over. Lighting won't correct unsafe speed, unsecured passengers, poor braking, or unstable loading. It can, however, help other road users see the cart and interpret its actions during dusk, nighttime, or mixed-traffic travel.
That distinction matters for owners who add decorative lighting first. A color-changing underglow system may make a cart more noticeable, but it doesn't provide the focused beam, brake response, or directional signaling needed for road communication. The useful package is layered:
- Forward visibility: Headlights with a controlled beam help the driver identify the route and help approaching traffic recognize the cart.
- Rear communication: Tail and brake lamps separate ordinary travel from deceleration.
- Directional information: Front and rear turn signals give traffic behind and ahead a clearer indication of the intended movement.
- Passive visibility: Reflectors continue to identify the vehicle when a lamp isn't aimed toward another road user.
Lighting also affects the property around the cart. If a resort or gated community is improving nighttime wayfinding, a cart lighting plan should complement fixed pathways and entrance areas. Guidance on how to boost curb appeal with landscape lighting can help property managers think about the relationship between vehicle visibility, pedestrian routes, and the surrounding environment.
Better lighting is useful, but it works best alongside seat belts, mirrors, a horn, controlled speed, sound battery maintenance, and disciplined passenger loading.
Voltage Reducers and Electrical Compatibility
The first electrical question isn't whether the cart is old or new. It's the voltage of the complete battery pack and the input range accepted by the lighting system. A 12-volt golf cart lights kit must not be connected directly to a 36- or 48-volt pack, and the same principle applies to higher-voltage platforms. Direct connection can destroy 12-volt LEDs and create a wiring-fire hazard.
A DC-DC voltage reducer converts the pack voltage to a regulated output suitable for the accessories. The reducer should receive power from the complete battery pack, not from a single battery in a series-connected system. Tapping one battery can create imbalance and unreliable operation.
Size the reducer from the real load
Add the normal current draw of every accessory connected to the reducer. Include headlights, tail lamps, brake lamps, turn-signal electronics, a horn, control boxes, and any other 12-volt equipment sharing that output. Then choose a reducer rated at least 25% above the calculated combined accessory current, as recommended in the DC-DC reducer installation guidance.
For example, if the measured or specified combined load is 4 amps, a reducer rated for at least 5 amps provides that engineering margin. Don't size the unit only for the headlamps if the same output also feeds a controller and horn. A reducer that operates at its limit may run hotter and leave no useful capacity for accessories added later.
Use a controlled installation sequence
Put the cart in Tow or maintenance mode if that feature is available, switch off the key, and disconnect the main negative terminal. Mount the reducer in a dry, accessible location with enough room for inspection and heat dissipation. Connect its input to the complete pack positive and negative terminals, then measure the regulated output with a multimeter before attaching the lighting harness.
The order matters. It reduces the chance of applying pack voltage to a 12-volt component while you work. It also gives you a clear checkpoint before the kit becomes part of the circuit. Reconnect the main negative only after the reducer and primary wiring have been secured, following the cart and reducer manufacturer's service instructions.
A lithium pack, a lead-acid pack, and a newer high-voltage platform can require different reducer specifications and installation practices. Don't assume that a reducer labeled for one system is suitable for another because the light kit uses the same connector. Confirm input range, output voltage, continuous current rating, grounding arrangement, and compatibility with the cart's switched power circuit.
Wiring Routing and Weatherproofing Techniques
A clean lighting installation protects the electrical components from the cart's movement, water, vibration, and service work. The best harness isn't merely hidden. It remains accessible, supported, fused, and easy to trace when a lamp stops working.
Start at the reducer's regulated output. Install the inline fuse in the positive lead immediately downstream of the reducer, before the branch wiring spreads toward the lamps. Calculate the normal current first and choose fuse protection slightly above that operating level, while keeping the wiring and components within their ratings. For low-amperage 12-volt accessories, 14- or 16-gauge wire is commonly suitable, but the final selection should follow the actual load, run length, and kit instructions.
Build the harness around the chassis
Route the harness along protected existing paths rather than across exposed suspension or steering areas. Keep wires away from sharp brackets, hot surfaces, pinch points, moving joints, and locations where water can collect. Leave enough controlled slack at lamps and body panels for service, but don't leave loose loops that can catch on brush or suspension components.
Fasten the harness at roughly 12- to 18-inch intervals, using the installation benchmark in this golf-cart light wiring guide. Use suitable clips or ties that won't cut into the insulation. Where a wire passes through metal, add abrasion protection such as a grommet or split loom.
The practical routing sequence looks like this:
- Mark the path: Follow the chassis and identify every movement point before cutting wire.
- Place the protection: Install the fuse near the reducer, then add loom or abrasion protection where the harness approaches metal.
- Make the branches: Run separate, labeled branches to the front lamps, rear lamps, signals, horn, and control equipment.
- Support the run: Secure the harness regularly and check full steering and suspension travel before tightening everything.
- Seal the connections: Use adhesive-lined heat-shrink or sealed waterproof connectors on every exposed splice.
Make the controls serviceable
Put the main switch where the driver can reach it without taking attention from the path. If the kit has a Bluetooth controller, mount it away from direct splash and leave enough access to inspect its connector. A controller buried under a body panel may look tidy on installation day, but it makes troubleshooting and replacement unnecessarily difficult.
For a focused forward-lighting setup, compare the electrical and mounting requirements of a Solana EV LED golf cart light bar with the rest of the harness. The light bar still needs correct voltage, fuse protection, a secure mount, and a beam position that doesn't blind approaching drivers.
Before closing panels, tug each connector lightly, inspect the insulation, and verify that no branch is rubbing against the frame. Weatherproofing is not a cosmetic step. Water entering a splice can create intermittent faults that are much harder to diagnose than a clean open circuit.
Preventing Parasitic Battery Drain
LED lamps usually consume less power than older lighting technologies, but that doesn't mean the cart's parked draw is negligible. A Bluetooth receiver, RGB controller, relay, or damaged harness can remain energized after the visible lights switch off. The result is a cart that appears shut down while its battery pack continues supplying a small load.
This is especially important for both lithium and lead-acid systems. The battery chemistry changes how the pack behaves and how it should be maintained, but neither chemistry makes incorrect accessory wiring harmless. The controller and power architecture can matter as much as the lamp wattage.
Choose switched power deliberately
A reliable arrangement feeds the reducer from the complete pack, then places the accessory circuit behind the cart's main power switch whenever possible. With the key off, the reducer and its connected controls should lose their supply. If the kit requires a permanently powered memory function, understand that trade-off before installation rather than assuming the controller sleeps perfectly.
Avoid connecting the lighting control box directly to unswitched pack power because that route is convenient. It can bypass the cart's normal shutdown behavior. A separate master accessory switch can work, but it must be clearly labeled and used every time the cart is parked.
The hidden load is often the controller, not the LED.
Test the parked circuit instead of guessing
After installation, turn off the lights, switch off the cart, and allow the controller to complete any normal shutdown process described by its manufacturer. Then use a multimeter capable of measuring current, or an appropriate current clamp, to check whether the accessory circuit continues drawing power. Follow the meter manufacturer's safety procedure, because an incorrectly placed meter can short the pack.
A practical diagnostic sequence is:
- Check the wiring path: Confirm the reducer input isn't connected to only one series battery and that the accessory feed is switched.
- Isolate the controller: Disconnect the Bluetooth or RGB control box and observe whether the parked draw changes.
- Inspect for damage: Look for crushed insulation, wet connectors, exposed copper, and loose terminals.
- Confirm shutdown behavior: Operate the key, accessory switch, controller, and lamps separately.
- Recheck after parking: Test again after the cart has sat undisturbed, because some electronics change state after the lamps turn off.
If the cart repeatedly loses charge while parked, don't compensate by replacing the battery immediately. First isolate the accessory circuit, confirm reducer behavior, and inspect the harness. The Solana EV battery care tips can complement that process, but battery maintenance won't correct a controller wired to permanent power or a reducer affected by a short.
Final Verification and Functional Testing
Final testing decides whether the kit is safe to use, or whether it only looked finished in the garage. A lamp that lights on command can still hide the problems that cause callbacks later. Weak grounds, reversed polarity, reducer sag under load, and switched circuits that stay partly awake are the faults to catch now, before the body goes back together.
Secure the cart, keep the drive system inactive, and test with a multimeter before and during operation. Check reducer output at rest, then again with the lights loaded. If voltage falls hard when the brake lights or turn signals come on, stop there and correct the supply side before chasing individual lamps. Confirm the fuse is intact, the positive and negative paths are correct, and the switching logic behaves the way the kit diagram says it should.
Test each function under real conditions
Start at the controls and work outward. Check low and high beam if the kit has both. Press the brake pedal several times and watch for a clean, repeatable response from the stop lamps. Run each turn signal long enough to confirm steady flash rate, then walk around the cart and verify that front and rear indicators are visible from the angles other drivers will see.
Separate tail-lamp testing from brake-lamp testing. Sound the horn. Turn the wheel lock to lock and make sure nothing pulls tight, rubs, or drops into the steering or suspension path. Then aim the lamps in low light so they illuminate the road surface without throwing unnecessary glare into approaching traffic.
For a street-oriented cart or LSV build, verify the equipment list against the governing authority as outlined in the compliance section above. Do not assume a brighter LED kit makes the cart street legal by itself. Legal classification depends on the full required equipment package and the rules that apply where the cart will be used.
The final inspection should include:
- Polarity: Confirm each lamp receives power and ground in the correct direction.
- Fuse protection: Check the fuse rating, holder condition, and positive-lead location.
- Mechanical security: Verify that lamps, reducer, switches, connectors, and harness supports do not move under normal use.
- Visibility: Inspect lamp placement, beam direction, signal visibility, and reflector position from relevant approach angles.
- Road readiness: Confirm the cart's classification, permitted roads, speed restrictions, registration, and any inspection requirements separately from the lighting hardware.
The embedded walkthrough below shows a full wiring and testing sequence. Compare each step against your kit manufacturer's instructions before energizing the circuit.
Leave the body panels open until the cart passes every electrical and functional check. Loose grounds, poor crimps, and unsealed splices are much easier to correct while the harness is visible. After that, perform a cautious test drive in the same type of environment where the cart will operate, then inspect mounts, connectors, and lamp function again once the cart is back in the shop.
Solana EV offers golf-cart lighting information and vehicle options that address headlights, tail lights, turn signals, controls, and voltage-reducer compatibility. Visit Solana EV to review its vehicles and lighting resources, then match the equipment to your cart's electrical system and local LSV requirements before installation.