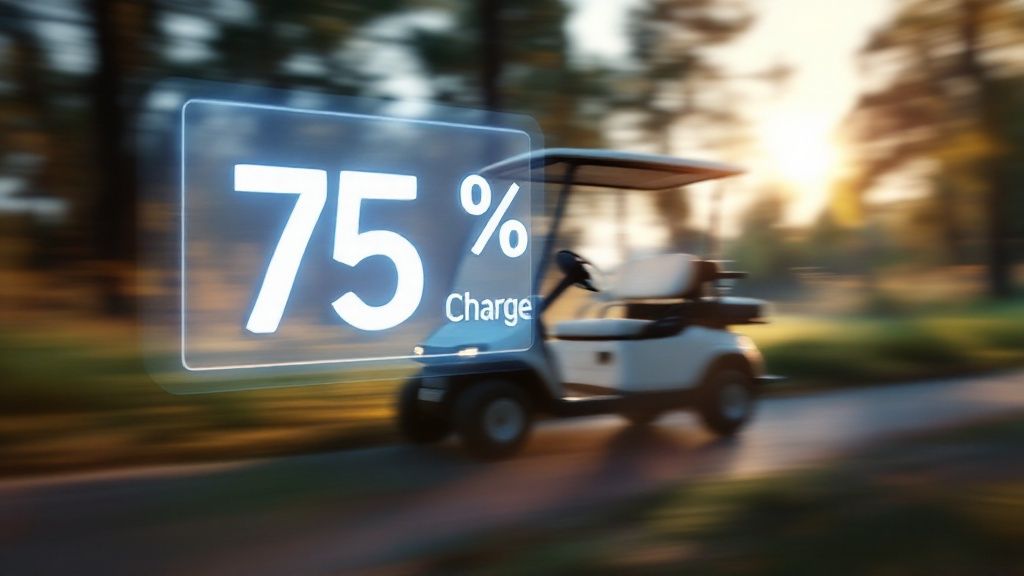
Think of your golf cart's battery gauge as its fuel gauge. It's easily the most important instrument on your dashboard, and truly understanding it is the secret to never getting stranded again. More than that, it's your first line of defense against doing serious, expensive damage to your battery pack.
Why Your Battery Gauge is Your Cart's Best Friend
You wouldn't drive your car if the fuel gauge was broken, right? You’d be constantly guessing, worried about when you'd run out of gas. A golf cart battery gauge does the same job, but the stakes are even higher for your electric cart.
Ignoring that little meter isn't just risking a long walk home—it's like flying blind. You could be permanently damaging your cart's most expensive component without even knowing it.
This guide will change all that. We're going to walk through everything you need to know about this small but mighty device, turning you from an anxious driver into a confident owner. When you master your gauge, you get peace of mind and protect your investment.
The Growing Need for Accurate Gauges
As more and more golf carts show up in neighborhoods, resorts, and work sites, the need for reliable battery monitoring has exploded. It’s no longer just a "nice-to-have" feature; it's essential.
The global golf cart battery market was valued at around $122.8 million in 2021. It's expected to hit an estimated $216.5 million by 2031, growing at about 5.9% each year. You can find more details on this trend in the golf cart battery market report from Allied Market Research.
This isn't just a random statistic. It shows a clear trend: with more carts on the path, there are more batteries that need proper care. A good battery gauge is the key to keeping them all running strong.
What You Will Learn
We’re going to cover all the bases to make you an expert on your cart’s power. Here's what we'll break down:
- How Gauges Work: We’ll get into the simple science of how they measure voltage to figure out your battery’s State of Charge (SoC).
- Analog vs. Digital: A straight-up comparison of the two main types, so you can figure out what’s best for you.
- Reading Interpretations: I’ll show you how to look at the numbers on your gauge and know exactly what they mean for your remaining range.
- Installation and Troubleshooting: We'll cover some practical tips for putting one in yourself and how to fix the most common issues when they pop up.
How Your Golf Cart Battery Gauge Actually Works
It’s tempting to look at your golf cart’s battery gauge and think of it like the gas gauge in your car—a simple needle showing how much "fuel" is left in the tank. But what's happening under the hood is actually a bit more clever and complex. Your gauge isn't measuring a liquid level at all. Instead, it’s acting more like a pressure meter, keeping an eye on your battery pack's voltage.
Think of your battery pack like a big water tank. When the tank is full, the pressure at the bottom is high. As the water level drops, the pressure decreases. Your battery gauge does something similar, reading this electrical "pressure" to estimate the remaining energy, or State of Charge (SoC). A freshly charged battery has a high voltage, and as you cruise around, that voltage slowly but surely drops.
Getting a feel for this relationship between voltage and charge is the real secret to understanding your gauge and avoiding that dreaded moment of being stranded on the back nine.
The Difference Between Resting and Load Voltage
Have you ever hit the accelerator to climb a hill and watched your battery gauge suddenly nosedive, only to pop right back up once you're on flat ground? That's the perfect real-world example of resting versus load voltage.
When you ask your batteries for a surge of power—like when accelerating hard or tackling an incline—the voltage temporarily sags under the strain. It's just like turning on every faucet and shower in your house at once; the water pressure momentarily drops everywhere. This reading, taken under load, isn't a true reflection of your battery's remaining life.
For the most accurate picture, you need to check the gauge when the cart has been sitting still for a minute or two. This resting voltage is the honest truth about your battery's SoC, letting you plan your trip without any unwelcome surprises.
Key Takeaway: Always trust the resting voltage reading. Any reading taken while accelerating or climbing a steep hill will make your battery look weaker than it actually is.
Gauges for Lead-Acid Versus Lithium Batteries
The type of battery powering your cart makes a huge difference in how your gauge works and how you should read it. The two big players, lead-acid and lithium, behave very differently as they discharge.
-
Lead-Acid Batteries: These are the old-school workhorses. They have a fairly linear discharge curve, meaning their voltage drops at a steady, predictable rate as they run down. This makes it pretty straightforward for a standard gauge (which is basically a voltmeter) to give you a reliable estimate.
-
Lithium-Ion Batteries: Lithium is a whole different ballgame. These batteries hold their voltage remarkably steady—almost flat—for most of the ride, then drop off sharply right at the very end. While this is fantastic for consistent performance, it makes it incredibly tricky for a simple voltage-based gauge to know if you're at 80% or 30%.
Because of this flat discharge curve, a cart with a lithium battery in a golf cart needs a smarter gauge. Modern lithium-compatible meters often use advanced algorithms that act more like a "fuel flow" computer, tracking the energy you use over time to give a much more precise percentage.
This is a big deal in an industry that's rapidly evolving. The golf cart battery market, valued at $1.49 billion in 2024, is on track to hit $2.21 billion by 2030, according to the latest market research. Much of that growth is driven by the switch to powerful 36V and 48V lithium systems that demand more sophisticated monitoring. Knowing which battery you have is the first step to truly understanding what your gauge is telling you.
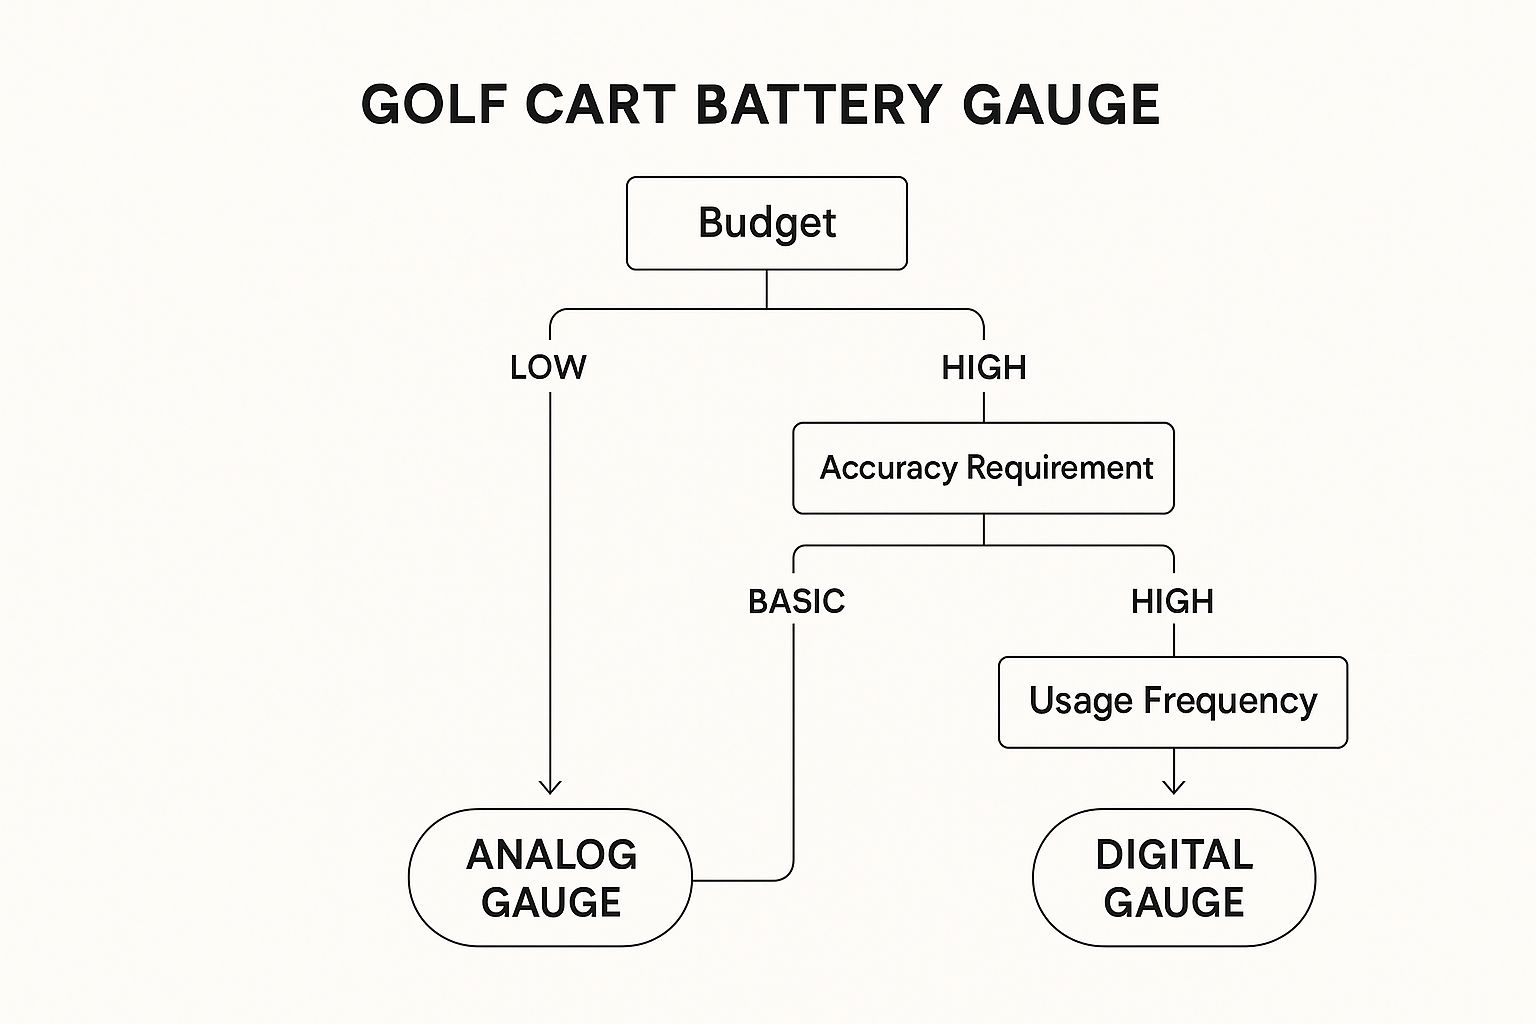
Analog vs. Digital: Picking the Right Battery Gauge
When it comes to choosing a battery gauge for your golf cart, you're essentially looking at two distinct technologies: the classic, needle-based analog gauges and the more modern, number-centric digital displays. There's no single "best" choice for everyone. The right one for your cart really boils down to how you use it, your budget, and how much precision you need.
Let's dig into the details to figure out which style makes the most sense for your dashboard.
The Old-School Charm of Analog Gauges
Think of an analog gauge as the trusty fuel gauge in an older car. It gives you a quick, at-a-glance understanding of your battery's status without overwhelming you with numbers. These gauges are simple, incredibly reliable, and generally easier on the wallet. They work with a physical needle that moves across a dial, usually marked with ‘F’ for Full and ‘E’ for Empty, often with color-coded zones.
The real advantage of an analog golf cart battery gauge is its straightforward nature. You don't have to interpret specific voltage numbers; you just see where the needle is pointing. For the casual rider who just needs to know if they have enough juice for a quick trip around the block, an analog gauge gets the job done without any fuss.
They’ve been the standard for decades for a few solid reasons: they’re tough, easy to understand, and because they have fewer complex electronics, they're less prone to weird electrical glitches.
Reading one is completely intuitive:
- Green Zone: You're good to go. Plenty of power left in the tank.
- Yellow Zone: You're running low. Probably a good time to start heading back to the charger.
- Red Zone: You're pushing your luck. Continuing to run the cart in the red can strain your batteries and shorten their lifespan.
This no-frills approach makes them a favorite for fleet managers or cart owners who just want a dependable, set-it-and-forget-it solution. The trade-off, however, is precision. It’s giving you a ballpark idea, not an exact measurement, which might not be enough for someone who needs to manage their battery health more meticulously.
The Pinpoint Accuracy of Digital Battery Gauges
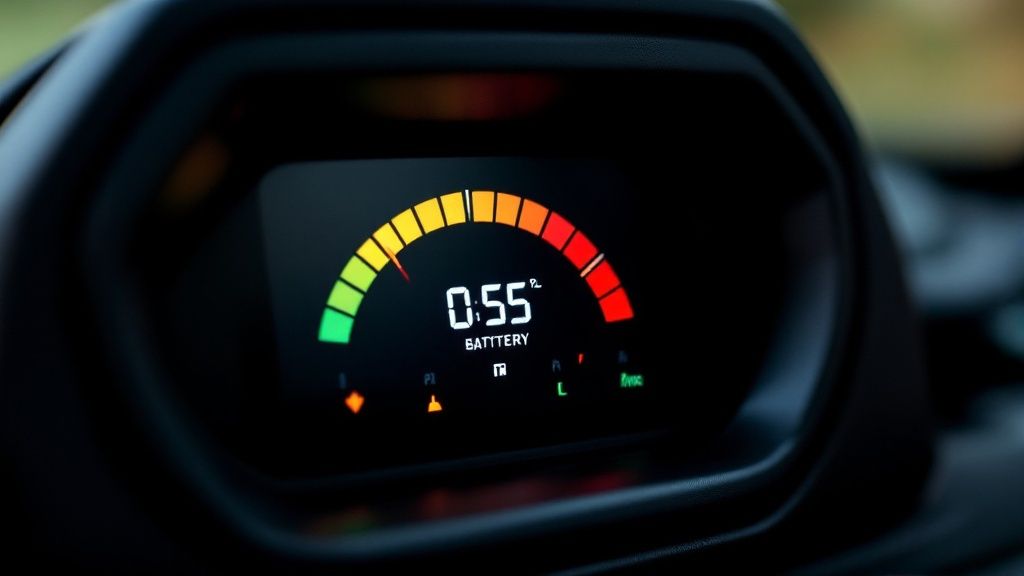
On the other side of the coin, digital gauges bring battery monitoring into the 21st century. They offer a level of detail that analog models just can't touch. Instead of a sweeping needle, a digital golf cart battery gauge gives you a crisp, numerical readout, often showing both the battery's exact voltage and the State of Charge as a percentage.
It’s like swapping out that old car's fuel gauge for a trip computer that tells you your exact range down to the last mile. On a 48V cart, seeing a display that reads 49.8V (80%) is a world of difference from just knowing the needle is "somewhere in the green." This kind of accuracy lets you make much smarter decisions, helping you max out your range without the nagging fear of getting stranded.
A digital gauge turns battery monitoring from a guessing game into an exact science. Knowing your precise voltage is key to following important battery health rules, like the 50% discharge limit for lead-acid batteries, with confidence.
Many digital models also come loaded with other useful functions that go way beyond a simple power reading. You'll often find features like:
- Hour Meters: To track total runtime and stay on top of your maintenance schedule.
- Warning Lights: For instant visual alerts when the battery is critically low or if another issue pops up.
- Battery Type Settings: Allowing you to calibrate the gauge for lead-acid, AGM, or lithium batteries to get the most accurate readings possible.
- Bluetooth Connectivity: Some higher-end gauges can even sync with your smartphone, letting you check your status from an app.
To help you decide, here's a quick side-by-side look at how these two types of gauges stack up.
Analog vs Digital Golf Cart Battery Gauge Comparison
| Feature | Analog Gauge | Digital Gauge |
|---|---|---|
| Display Type | Sweeping needle over a color-coded dial (F to E). | LCD/LED screen showing specific numbers (voltage, percentage). |
| Precision | Low. Provides a general estimate of charge. | High. Gives an exact voltage and/or percentage reading. |
| Readability | Excellent for a quick, at-a-glance look. | Requires a moment to read and interpret the numbers. |
| Cost | Generally more affordable. | Typically more expensive, especially with advanced features. |
| Durability | Very reliable due to simple mechanical/electrical parts. | Can be susceptible to electronic failure, though modern units are robust. |
| Features | Basic state of charge indication only. | Often includes extras like hour meters, alarms, and battery type settings. |
| Best For | Casual users, fleet carts, budget-conscious owners. | Data-driven owners, lithium battery users, daily drivers. |
Ultimately, what you value most will steer your decision. If you're after an affordable, hassle-free gauge for occasional trips, the classic analog model is a perfectly solid choice. But if you're serious about protecting your battery investment—especially with expensive lithium packs—or you rely on your cart daily, the precision and extra features of a digital gauge are well worth the upgrade.
Interpreting Your Gauge Readings Like a Pro
Your golf cart's battery gauge isn't just a simple needle or a set of bars; it's the most direct way to understand what's happening with your power source. Think of it as learning the language of your cart. Once you can translate those volts and percentages into real-world meaning, you'll unlock more range and protect your investment.
This isn't about becoming an electrical engineer. It’s about knowing a few key numbers that tell a story. Saying it's 75°F outside is a lot more useful than just saying it's "warm," right? The same logic applies here. Knowing your 48V battery is sitting at 49.8V gives you way more confidence than just seeing a needle in the green.
Decoding the State of Charge for Lead-Acid Batteries
If you're running traditional lead-acid batteries, voltage is your most trusted friend. These batteries lose voltage in a very predictable way as they drain, so a quick look at your gauge gives you a surprisingly accurate snapshot of your remaining juice. For the best reading, always check the voltage when the cart is at rest.
Here’s a handy cheat sheet for the most common systems.
48V Lead-Acid Battery State of Charge Chart
| Resting Voltage | State of Charge (SoC) | What It Means |
|---|---|---|
| 50.9V | 100% | Fresh off the charger. Go anywhere you want. |
| 50.0V | 80% | Plenty of power left for a typical outing. |
| 49.5V | 70% | You've still got a good amount of range. |
| 48.4V | 50% | STOP! This is your cue to head back. |
| 47.0V | 20% | You're in the danger zone. Risking damage. |
36V Lead-Acid Battery State of Charge Chart
| Resting Voltage | State of Charge (SoC) | What It Means |
|---|---|---|
| 38.2V | 100% | Peaked and ready to roll. |
| 37.5V | 80% | A strong charge for most of the day. |
| 37.1V | 70% | Solid range left in the tank. |
| 36.3V | 50% | STOP! Time to plug in. Don't push it. |
| 35.0V | 20% | Critically low. Get to a charger immediately. |
The Critical 50% Rule Explained
For anyone with lead-acid batteries, that 50% mark is the golden rule. If you consistently drain your batteries below this point, you're causing real, irreversible damage to the lead plates inside. It's a process called sulfation, and it's a battery killer.
This is non-negotiable for battery health. Treating 50% as your "empty" mark can dramatically extend your battery pack's service life, saving you from a costly premature replacement. Adhering to this rule is the single best thing you can do for your lead-acid batteries.
So, when your 48V cart's gauge shows a resting voltage of 48.4V, that's your signal to head home and plug it in. Sure, you could probably squeeze a little more distance out of it, but you'd be trading a few minutes of ride time for months or even years of battery life. Understanding why this matters is key, which is why we break down how care impacts your golf cart battery lifespan in our detailed article.
Interpreting Readings for Lithium Batteries
Now, lithium batteries play by a completely different set of rules. Their voltage output is incredibly stable—it holds almost steady from 80% all the way down to 30% before falling off a cliff. This means a simple voltmeter is practically useless for gauging a lithium battery's charge.
This is exactly why a percentage-based digital golf cart battery gauge is an absolute must-have for lithium. These gauges use a smart device called a shunt that actually measures the energy flowing out of the battery, giving you a true, accurate percentage. You can trust what it says.
This huge difference in technology is a big reason the golf cart battery market is changing so fast. In 2024, the market was valued at $184.45 million and is on track to blow past $273.74 million by 2032. As more people switch to different battery chemistries, from lead-acid to lithium, understanding their specific needs becomes more important than ever. You can dig into these market dynamics from Consegiic Business Intelligence for a deeper look.
Installing or Upgrading Your Battery Gauge
Putting a new battery gauge in your golf cart is one of the most satisfying DIY jobs you can do. It doesn't require a master mechanic's tool chest—just some basic tools and a little patience. The reward for your effort is huge: you get a crystal-clear window into your cart's power level and battery health.
Think of it like swapping out the basic fuel gauge in an old truck for a modern digital display. You’re not just modernizing the dash; you're giving yourself the information needed to make smarter decisions every time you drive. Let's walk through how to get it done right.
Safety First: Don't Skip This Step
Before you even think about touching a wire, let’s talk safety. You're dealing with a serious electrical system, and a few minutes of prep will prevent a nasty shock or a costly mistake.
The absolute first thing you must do is disconnect the battery pack. Find your cart's tow/run switch and flip it to the "Tow" position. This is like a main breaker for your cart. After that, physically unhook the main positive and negative cables from the battery pack. Now you can be certain the system is completely powered down.
Step-by-Step Installation Guide
With the power off, you’re ready to get to work. The process is pretty similar whether you're working on a Club Car, EZGO, or Yamaha.
-
Mount the Gauge: Pick a spot on the dash where you can easily see the new gauge. Most aftermarket gauges are designed to fit a standard two-inch round hole. If you're just swapping an old one out, the new one should fit perfectly. If this is a new addition, you'll need to use a hole saw to carefully cut a clean opening.
-
Find Your Wires: Your new gauge will have at least two wires: positive and negative. The trick is to wire it so it only comes on with the key. To do this, you'll tap the gauge's positive wire into the "switched" side of your key ignition. The negative wire needs to run all the way back to the main negative terminal of the entire battery pack, not just a single battery.
-
Run the Wires Neatly: Route the wires from the back of the gauge, down through the dash, and toward the key switch and battery pack. Take a moment to secure the wiring with zip ties. You want to keep them away from any moving parts or sharp metal edges that could chafe the insulation over time.
-
Make the Connections: Connect the positive wire to the correct terminal on the back of your key switch. Then, run the negative wire and connect it firmly to the main negative post of your battery pack. Make sure both connections are snug—a loose wire is a common cause of a faulty reading.
-
Test and Program: Time for the moment of truth. Reconnect the main battery cables and flip the tow/run switch back to "Run." Turn the key, and your new gauge should spring to life. If it's a digital model, you'll likely need to configure it for your cart’s voltage (36V or 48V) and specific battery type (Lead-Acid, AGM, or Lithium).
Pro Tip: Don't guess which wire on the key switch is the right one. A simple multimeter will tell you exactly which terminal gets power only when the key is turned on. This one step prevents your new gauge from slowly draining your batteries while the cart is parked.
Overcoming Common Hurdles
Even the best-laid plans can hit a snag. A common trip-up is setting the correct voltage on a digital meter. If you're not sure, just count the number of batteries in your pack and multiply by their voltage (most are 6V, 8V, or 12V) to get the total.
Getting the settings right is even more important for lithium batteries, as their discharge curve is very different. Always double-check the manufacturer's instructions to match the gauge's programming to your specific battery chemistry for an accurate reading.
Troubleshooting Common Gauge Problems

Even the most dependable golf cart battery gauge can start acting strange now and then. When it does, a little methodical troubleshooting can save you a ton of hassle and a trip to the repair shop. Thankfully, most of these quirks trace back to simple connection issues, not a total system meltdown.
Before you panic, just remember the gauge is only the messenger. It's reporting what it sees from the batteries. That means a weird reading could be a problem with the gauge itself, or it could be your first clue that something deeper is going on with your battery pack. Let's walk through the most common symptoms and how to fix them.
Symptom: The Gauge Is Completely Dead
You turn the key, and… nothing. The gauge is totally dark. This is almost always a power supply problem, meaning the gauge simply isn't getting the juice it needs to turn on.
Here’s a quick checklist to run through:
- Check the Fuse: A lot of gauges have a small in-line fuse. Find it and see if it's blown. If it is, a quick replacement should get you back in business.
- Inspect the Wiring: Take a close look at the positive and negative wires running from the back of the gauge. You're hunting for loose connections, any corrosion building up on the terminals, or a wire that's been pinched or frayed. A solid, clean connection is absolutely critical.
- Confirm Key Switch Power: Your gauge's positive wire needs to connect to a terminal on the key switch that's only "hot" when you turn the key to the "on" position. If that connection is shaky or on the wrong post, your gauge will never power up.
Symptom: The Gauge Always Reads Full
A gauge that’s stuck on full is one of the most frustrating problems because it gives you a false sense of confidence that can leave you stranded. More often than not, this points directly to a bad ground (negative) connection.
Think of it this way: the gauge works by measuring the difference in voltage between the battery pack's main positive and main negative terminals. If that negative wire is loose, corroded, or disconnected, the gauge can't measure that difference accurately and often defaults to showing a full charge.
Carefully trace the entire negative wire from the gauge back to where it connects to the main negative post of your battery pack. Make sure the connection point is clean, tight, and completely free of corrosion.
Symptom: The Readings Are Inaccurate or Bouncing Around
What if your gauge seems to have a mind of its own, dropping from 100% to 20% in a few minutes or jumping all over the place? This is where you have to figure out if you have a faulty gauge or a sick battery.
Sometimes, an inaccurate golf cart battery gauge can be recalibrated—check the user manual for instructions. But if the readings are truly erratic, it often signals a bigger problem.
This kind of behavior can be a classic sign of a failing battery cell in your pack. When one battery is much weaker than the others, it can drag the whole pack's voltage down and cause it to behave unpredictably, especially when you accelerate. The best move here is to do a full health check on your batteries.
You can find a step-by-step process in our guide on essential https://solanaev.com/maintenance-on-golf-cart-batteries/ to help you find the true source of the problem. Staying ahead of these issues by including your gauge in an effective preventive maintenance schedule is always the smartest strategy.
Got Questions? We've Got Answers
Even after you get the hang of your golf cart's battery gauge, some common questions tend to surface. Let's tackle the ones we hear most often so you can handle your cart like a seasoned pro.
Can I Put a 48V Gauge on My 36V Cart?
In a word, no. You absolutely need to match the gauge to your cart's voltage. Each golf cart battery gauge is specifically calibrated to read a particular voltage range.
If you hook up a 48V gauge to a 36V system, it's going to read "empty" all the time. Why? A fully charged 36V battery pack sits around 38.2 volts, which is way below the "dangerously low" threshold for a 48V system. The gauge simply can't understand the numbers it's seeing.
It's like trying to measure a shot of espresso with a one-gallon jug—the scale is just completely wrong. So, always buy the gauge that’s made for your cart's voltage, whether it’s 36V, 48V, or 72V.
Why Does My Gauge Plummet When I Go Uphill?
Don't panic! This is completely normal and it's a classic example of something called voltage sag.
Think of your motor as being thirsty for power. When you're just cruising on a flat path, it's taking small sips. But when you hit a steep hill or punch the accelerator, it starts gulping down power. This sudden high demand causes the battery pack's voltage to dip temporarily.
Your gauge is just doing its job and reporting that momentary dip in real-time. As soon as the load eases up—when you reach the top of the hill or stop—the voltage bounces right back, and the gauge will show you a more accurate resting charge. This is exactly why the best time to get a true reading is when the cart is standing still.
Expert Tip: While some voltage sag is expected, pay attention if it gets worse over time. If the gauge drops more dramatically than it used to on the same hill, or takes longer to recover, it could be an early sign that your batteries are getting old and losing their punch.
How Often Should I Be Looking at My Gauge?
Getting into the habit of checking your gauge is one of the best things you can do for the health of your batteries. A simple routine is all it takes.
- Before You Drive: Always take a peek before you head out. This gives you a starting point and ensures you’re not about to run out of juice halfway through your trip.
- On Longer Rides: Glance at it during breaks when the cart is at rest. It's a great way to see how much power you're using and judge if you need to start heading home.
- While in Storage: If your cart is sitting for a while, check the gauge every few weeks. Batteries slowly lose charge even when they aren't being used, and this quick check will prevent them from draining to a level that could cause permanent damage.
Ready to stop guessing and start driving with confidence? Solana EV builds street-legal golf carts with clear, reliable battery monitoring systems so you're never in the dark about your power levels. Take a look at our top-tier electric vehicles and find your perfect ride at https://solanaev.com.