
Your phone's maps are current, your music lives on your iPhone, and your car still has a radio that predates both. Then you see a small wireless dongle promising Apple CarPlay for older cars in minutes and wonder if it's that simple. Sometimes it is. Often it isn't, because that dongle can't create CarPlay where the head unit never had it. I would start by checking what your car already does, then pick one of four routes: wireless adapter, replacement head unit, interface module, or portable screen.
Table of Contents
- Check Whether Your Car Can Take CarPlay
- Pick the Right Route for Your Car
- How to Install a Replacement Head Unit Step by Step
- Fixing Black Screens, Drops and Lost Features
- Safety Limits Before You Drive
- Confirm the Setup and Choose Your Next Step
Check Whether Your Car Can Take CarPlay
A car's model year narrows the search, but the trim and installed head unit determine whether CarPlay is available. Use the year as a starting point, then verify the system before choosing an upgrade.
| Model Years | Factory CarPlay Likelihood | What to Do Next |
|---|---|---|
| 2010 to 2013 | Rare | Check for factory CarPlay; if it is absent, consider a replacement head unit, vehicle-specific module or portable screen |
| 2014 to 2015 | Uncommon | Check the trim and head unit for wired CarPlay before buying anything |
| 2016 and later | Much more common | Check the trim; if the head unit already launches CarPlay, a wireless adapter may be enough |
Trim and optional technology packages create exceptions, so the year is a filter, not a verdict. A wireless CarPlay adapter buying guide explains the key limitation: an adapter converts an existing wired CarPlay connection to wireless. It cannot add CarPlay to a head unit that lacks it.
Run These Five Checks on Your Car
- Identify the car and head unit: Record the model year and trim. Use the faceplate model number or owner's manual to identify the head unit.
- Launch wired CarPlay: Connect a compatible iPhone and confirm that CarPlay opens on the head-unit screen.
- Check the USB port: It must carry data, not just power for charging. Older cars often have USB-A ports; newer systems may use USB-C.
- Test before buying: Run wired CarPlay with your phone before ordering any adapter from any seller.
- Check compatibility: If wired CarPlay works, compare the adapter's connector and compatibility list with your exact head unit.
Connect directly to the car during the test. A hub or conversion cable can pass power but interrupt data, making a working system appear incompatible.
Practical rule: A phone that only charges proves nothing. CarPlay must appear on the screen and stay connected after you cycle the ignition.
If the test passes, a wireless adapter can change how the phone connects while leaving the factory head unit in place. If the car has no factory CarPlay, an adapter cannot supply it. You'll need a route that adds the feature, chosen according to the car's dash and the factory functions you want to retain.
Pick the Right Route for Your Car
| Route | Best When | Keeps Factory Audio and Controls | Typical Professional Cost |
|---|---|---|---|
| Wireless CarPlay adapter | Factory radio already launches wired CarPlay | Yes, the factory radio stays in place | Adapter only, no professional installation |
| Replacement head unit | No factory CarPlay and a dash that accepts an aftermarket unit | Kept with a matched harness, amplifier connection and steering-wheel interface | $400 to $1,000 installed |
| Interface module | Steering controls, backup camera or chimes must keep working | Yes, for the functions it matches | Added to the head-unit installation |
| Portable screen | Short-term use, leased cars or no dash modification | No, it sits on the dash or clips on | Self-installed, no labor charge |
The first row is where most owners get misled. Wireless CarPlay describes how the phone connects. Adding CarPlay describes whether the car has the platform at all. An adapter handles the first job only.
A replacement head unit is the main route for 2010 to 2015 cars without factory CarPlay, and Kevin's Autos figures for 2024 to 2025 put a typical professionally installed Apple CarPlay upgrade at approximately $400 to $1,000. If you're weighing platforms while you shop, this CarPlay versus Android Auto comparison helps, since many receivers support both.
What the Table Doesn't Show
An interface module rarely works as a standalone purchase. It's the translator between a new receiver and factory systems, so steering-wheel buttons, warning chimes, a backup camera and amplified audio keep behaving normally. Skip it on a car that needs one and you'll get CarPlay on a screen surrounded by dead controls.
A portable screen avoids dash work, which suits leased cars and owners who won't cut trim. The trade-offs are real. It sits in your sightline, it needs a mount that won't shift under braking, and a unit baked in direct sun can shut down or age fast.
Answer three questions in order and the route picks itself:
- Does the car already launch wired CarPlay? If yes, stop at the adapter row.
- Do steering controls, a camera or chimes have to keep working? If yes, budget for the matched interface with the new head unit.
- Will you modify the dash? If no, the portable screen is your row, with its compromises accepted upfront.
How to Install a Replacement Head Unit Step by Step
This is a staged swap, not a screen change, and the stages below match the method set out in CarTech Studio's CarPlay device guide, which puts installation estimates for aftermarket units at about 2 to 4 hours.
The sequence looks like this before you start.
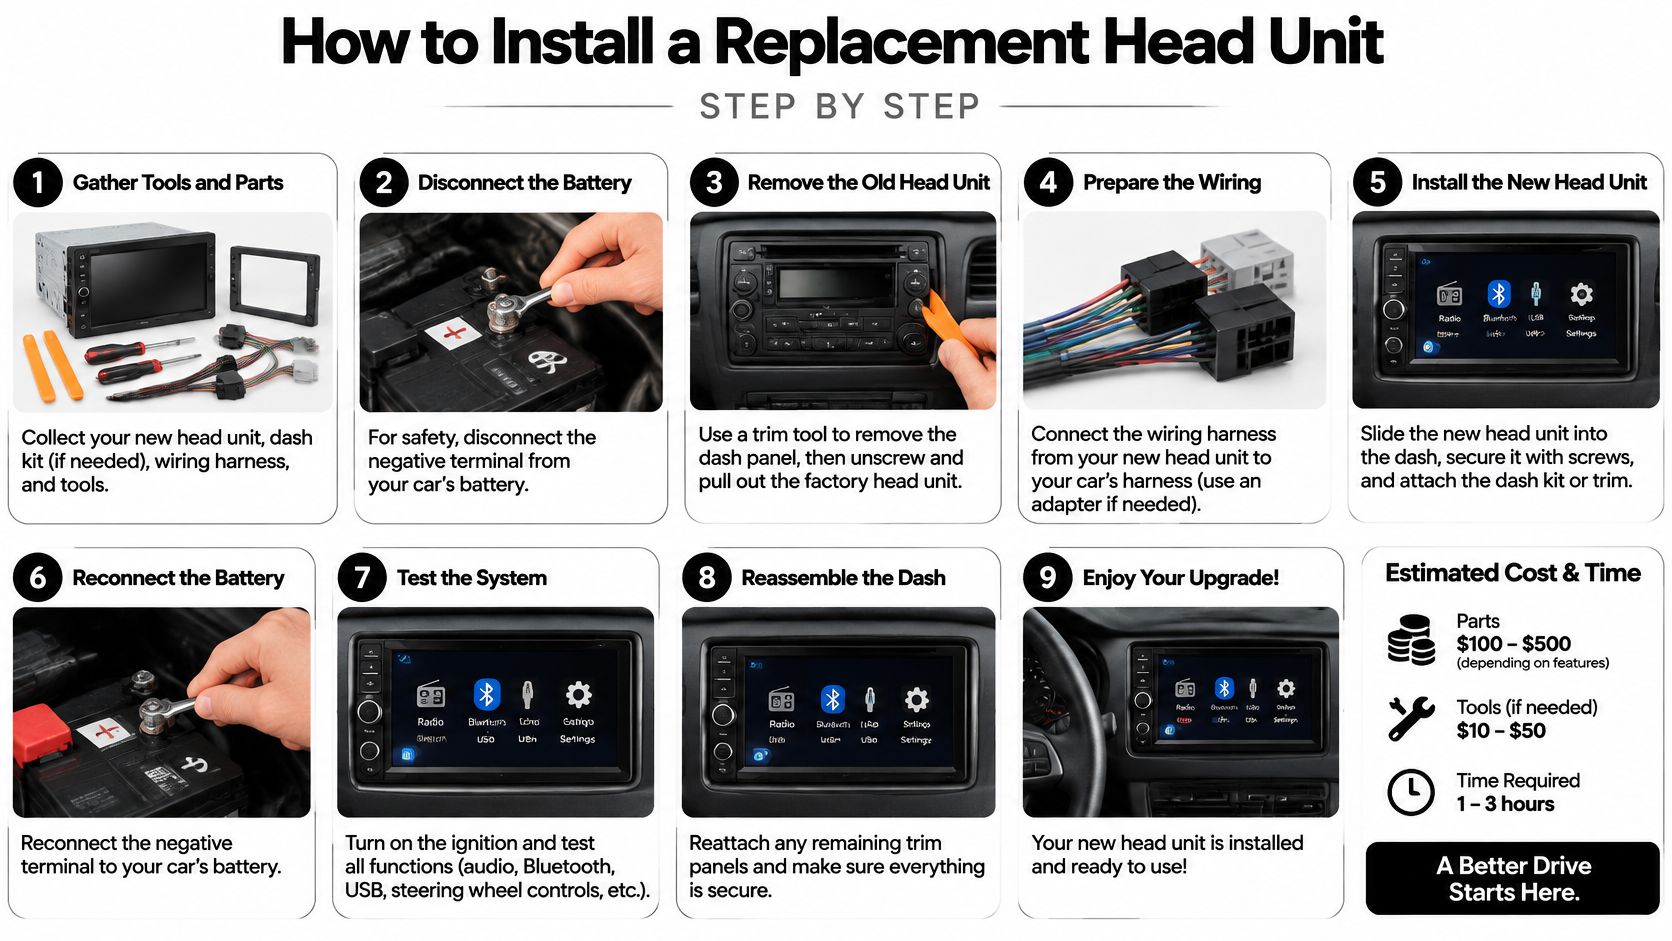
Steps 1 to 3 Prepare the Job
1. Document every factory feature first. List steering-wheel controls, backup camera, factory amplifier, parking sensors, USB inputs and vehicle settings screens. That list defines what must survive the swap, and it's far easier to write it while everything still works than to reconstruct it from memory with the dash open.
2. Match the parts to the exact vehicle. Order the dash kit, wiring harness, antenna adapter and, where needed, a CAN-bus interface for your specific year and trim. The common slip is buying a harness by model name alone. Two trims of the same car can use different amplifier wiring, and that one mistake costs you audio.
3. Disconnect the battery and keep the original unit. Pull the negative terminal before unplugging anything. Leave the factory radio on the bench, intact, until every function on the new unit passes. If something won't integrate, you can refit it and still drive the car.
Steps 4 to 6 Prove It Works
4. Bench-test the new head unit on a table. Power it outside the dash and check wired CarPlay, microphone input, camera image, each audio channel and boot behavior. A fault found here takes minutes to trace. The same fault found after the trim is refitted means pulling the dash apart again.
5. Install without cutting factory wiring. Use harness adapters for every connection so the job stays reversible. Route the microphone to the top of the A-pillar or the headliner edge near the driver, clipped so it can't droop, and plug the phone lead into a data-capable USB port, not a charge-only outlet.
6. Validate across several ignition cycles. Check steering controls, dimmer illumination, reverse-trigger behavior, audio balance front to rear, and whether the phone reconnects on its own each restart. Test the camera in daylight and at dusk, because a camera-voltage mismatch can pass one and fail the other.
Cosmetic fit is not evidence of compatibility. A unit that sits flush in the dash has proven nothing yet.
Expect the clock to grow when a factory amplifier, a proprietary display or integrated vehicle controls have to be retained. That's integration work, not slow work. Accept the retrofit only when the full functional checklist passes, and keep the old unit until you've driven the car a few days.
Fixing Black Screens, Drops and Lost Features
| Symptom | Likely Cause | Fix |
|---|---|---|
| Black screen after ignition on | Dropped power or a charge-only USB port | Recheck the harness connectors and move to a data-capable USB port |
| CarPlay drops after each restart | Phone permissions or receiver firmware | Re-pair the phone, check permissions and update receiver firmware |
| Siri cannot hear the driver | Microphone placement or wiring | Move the microphone closer to the driver and recheck its wiring |
| No audio through the speakers | Lost amplifier routing or wrong audio output | Recheck speaker outputs and the amplifier setting |
| Steering-wheel buttons do not work | No matched CAN-bus interface | Add the interface module matched to the vehicle |
| Reverse camera will not show | Camera voltage mismatch or missing reverse trigger | Verify camera voltage and connect the reverse trigger wire |
Most of these faults sit in wiring, phone permissions, wireless interference or receiver firmware, not in defective hardware. When a symptom isn't listed, sort it into one of four groups. Power and data faults trace to the harness and USB port. Software faults trace to pairing, permissions and firmware. Signal faults trace to the microphone and audio routing. Control faults trace to a missing vehicle-matched interface or trigger wire.
For a camera that stays dark after you've confirmed power and the reverse trigger, T1A Auto's walkthrough on how to diagnose a backup camera black screen works through the camera side of the fault step by step.
Quick Fixes and Slower Ones
Reseating a connector, re-pairing the phone or moving to another USB port takes minutes, so always start there. Relocating a microphone, updating stubborn firmware or adding a CAN-bus interface takes longer and may mean reopening trim.
Heat causes its own failures. One current installation guide from Aoocci cites dashboard temperatures reaching about 160°F (71°C) and recommends equipment rated for high ambient temperatures, which matters for portable screens in cars parked outdoors.
Fixing these details is worth the effort. The AAA Foundation summary of its 2018 study reported smartphone-based systems were 24% faster, about 5 seconds, when placing a call and 31% faster, about 15 seconds, when programming navigation than native systems, but a flaky microphone or dropping connection erases that advantage.
After any fix, rerun the full functional checklist. One repair can change another function.
Safety Limits Before You Drive
Mount the display within your normal sightline, where a glance doesn't mean turning your head. Secure it so it can't move under braking, and keep it clear of airbag deployment zones and anything that blocks your view through the windshield. A portable screen on a weak suction mount fails this test on the first hard stop.
Place the microphone where you speak naturally, then make a hands-free call with the windows up and the fan running. If the other person asks you to repeat yourself, move the mic before you drive, not after. This setup work applies the same way to Apple CarPlay with a backup camera, where screen position affects how fast you read the camera image.
A clean install doesn't make screen interaction safe at speed. CarPlay still demands your attention, so treat it as less distracting than a clumsy old interface, never as distraction-free.
Your Pre-Drive Routine
- Set it while parked: Enter navigation destinations, queue calls and pick playlists before you move.
- Use voice for the rest: Let Siri handle messages and calls once you're rolling.
- Keep touches short: If a change needs more than a glance, stop somewhere safe and make it there.
Run one final check before the first real trip: display position, microphone placement, clear sightline to the road, airbag zones kept clear, and every control reachable without looking away. If the driver has to hunt for a button, the install isn't finished.
Confirm the Setup and Choose Your Next Step
Before using the car normally, confirm that the retrofit works across several starts, not just the first connection. Check that:
- CarPlay appears on the head-unit screen when the phone connects.
- The connection survives three ignition cycles without re-pairing or unplugging.
- Steering-wheel controls, the backup camera, warning chimes and audio balance all work.
- A hands-free call and a Siri request are clear with the microphone in its installed position.
- The wiring and harness are documented so the installation can be reversed later.
The image below shows account, payment and notification settings, not a head-unit test record. Use the five checks above as your pass-or-fail list.
If a check fails, address the symptom before driving and repeat all five checks. A backup camera that works intermittently is still a failed test. The walkthrough below shows a completed setup and first connection.
Do It Yourself or Hire It Out
A DIY installation makes sense if you can bench-test the unit, match the harness to the exact trim, and set aside time to troubleshoot. The trade-off is easier to manage on a car with manual controls and no factory amplifier.
Hire a professional if the job must retain a factory amplifier, proprietary display or integrated vehicle controls. The stated installed range is $400 to $1,000. Compare that cost with the risk of buying an incompatible interface; if vehicle settings run through the factory radio, professional installation is the safer choice.
Solana carts support CarPlay and Android Auto, so those carts do not require this retrofit decision. For an older car, choose the route that fits its equipment, then book the installation or begin the bench test. If you would rather consider a vehicle with phone integration already included, Solana EV offers street-legal golf carts and electric UTVs. Browse the lineup and find a dealer at Solana EV.