
The brake light switch on your golf cart is a small but mighty part. It's the tiny component that tells your brake lights to turn on the moment you press the pedal—a crucial safety signal for anyone behind you, whether you're on a community path or a resort road. Getting a handle on how it works is the key to figuring out what's wrong when it doesn't.
What Your Golf Cart Brake Light Switch Actually Does
I like to think of the brake light switch as a simple gatekeeper. When your foot is off the brake, the switch keeps the electrical circuit open—no power flows. The second you press that pedal, the switch closes the circuit, completing the connection and sending power from your battery to the brake lights. They light up instantly.
It's a basic on-off job, but it's absolutely fundamental for safety. This is a non-negotiable part for any street-legal vehicle, including premium carts like the Solana XA and Solana F. Without a working switch, you’re essentially invisible to anyone trailing you when you slow down.
Common Types of Switches
You'll run into a couple of different types of switches, depending on your cart's age and model.
- Mechanical Switches: These are by far the most common. They usually look like a small button or plunger that gets physically pressed by the brake pedal assembly when you push it down. Simple and effective.
- Pressure Switches: If your cart has hydraulic brakes, you might find one of these. Instead of physical contact, they're triggered by the buildup of pressure in the brake fluid.
Tell-Tale Signs of a Failing Switch
A bad brake light switch usually gives you some pretty clear warning signs. It's not a mystery—the problems show up directly in your lights. If you're running into general lighting trouble, our guide on troubleshooting your golf cart lights can help you narrow things down even further.
To help you get straight to the point, here’s a quick reference table.
Quick Diagnosis for Brake Light Switch Issues
Use this table to quickly identify if your brake light issues point to a faulty switch.
| Symptom | What It Likely Means for Your Switch | Next Steps to Consider |
|---|---|---|
| Brake lights stay on all the time | The switch is stuck in the "closed" (on) position | Check for physical obstructions or internal failure |
| Brake lights don't turn on at all | The switch is stuck "open" or has failed completely | Test for continuity and check wiring connections |
| Brake lights flicker or work intermittently | The switch has a loose internal connection or is failing | Inspect wiring and consider immediate replacement |
This table should give you a solid starting point for figuring out if the switch itself is the culprit.
It's no surprise that the market for these components is growing. The automotive switch market was valued at $6.2 billion in 2021 and is on track to hit $7.5 billion by 2026. That trend, which you can read more about on marketsandmarkets.com, reflects a bigger focus on safety and reliability that’s trickled down to the golf cart world.
Key Takeaway: A failing brake light switch isn't just a minor annoyance—it's a major safety risk. Catching the signs early is the best way to prevent an accident and keep your cart compliant with local rules.
Getting Your Tools and Safety Prep Done Right

Before you dive in and start messing with the brake pedal, let's talk about setup. A smooth repair comes from having the right tools ready and taking safety seriously. I've seen simple jobs turn into major headaches because someone skipped these prep steps.
First things first, make sure your cart isn't going anywhere. Always work on a flat, level surface. To be extra safe, wedge some wheel chocks against the tires. It's a simple step, but it's the one thing that guarantees the cart stays put while you're focused on the task at hand.
First Rule: Safety First
This is the most critical part: disconnect the main battery pack. On most carts, you'll find a tow/run switch. Flipping it to "Tow" is the first step, but I always go a step further and physically disconnect the main negative battery terminal. Don't skip this.
Taking this precaution completely removes the risk of a nasty shock or frying a component. The last thing you want is to cause a short that damages the cart's controller or the brand-new golf cart brake light switch you're about to put in.
The Tools You'll Actually Need
Getting everything you need together before you start saves a ton of frustration. You don't need a professional mechanic's toolbox, but a few key items are non-negotiable for doing this job correctly.
- Multimeter: This is your best friend for any electrical work. It's the only way you can be 100% sure the old switch has failed and that your new one is working before you button everything back up.
- Socket and Wrench Set: You'll need these for the mounting bracket bolts. A basic set with a few common sizes will do the trick.
- Wire Strippers/Crimpers: If you find any frayed wires or need to replace a connector, you'll be glad you have these.
- Good Electrical Tape: Spend the extra dollar on quality tape. It provides better insulation and holds up against moisture and vibrations, which is crucial in a golf cart.
A quick note for fleet managers: Making this tool kit and safety check a standard procedure for your techs is a smart move. It protects your crew and helps you avoid expensive, easily preventable damage to your Solana EV carts.
How to Accurately Test a Suspect Brake Light Switch
So, your brake lights are on the fritz. Before you jump online and order a new part, hold on. A few minutes with the right approach can confirm if the golf cart brake light switch is actually the culprit, saving you some cash and a potential headache. Let’s get to the bottom of it.
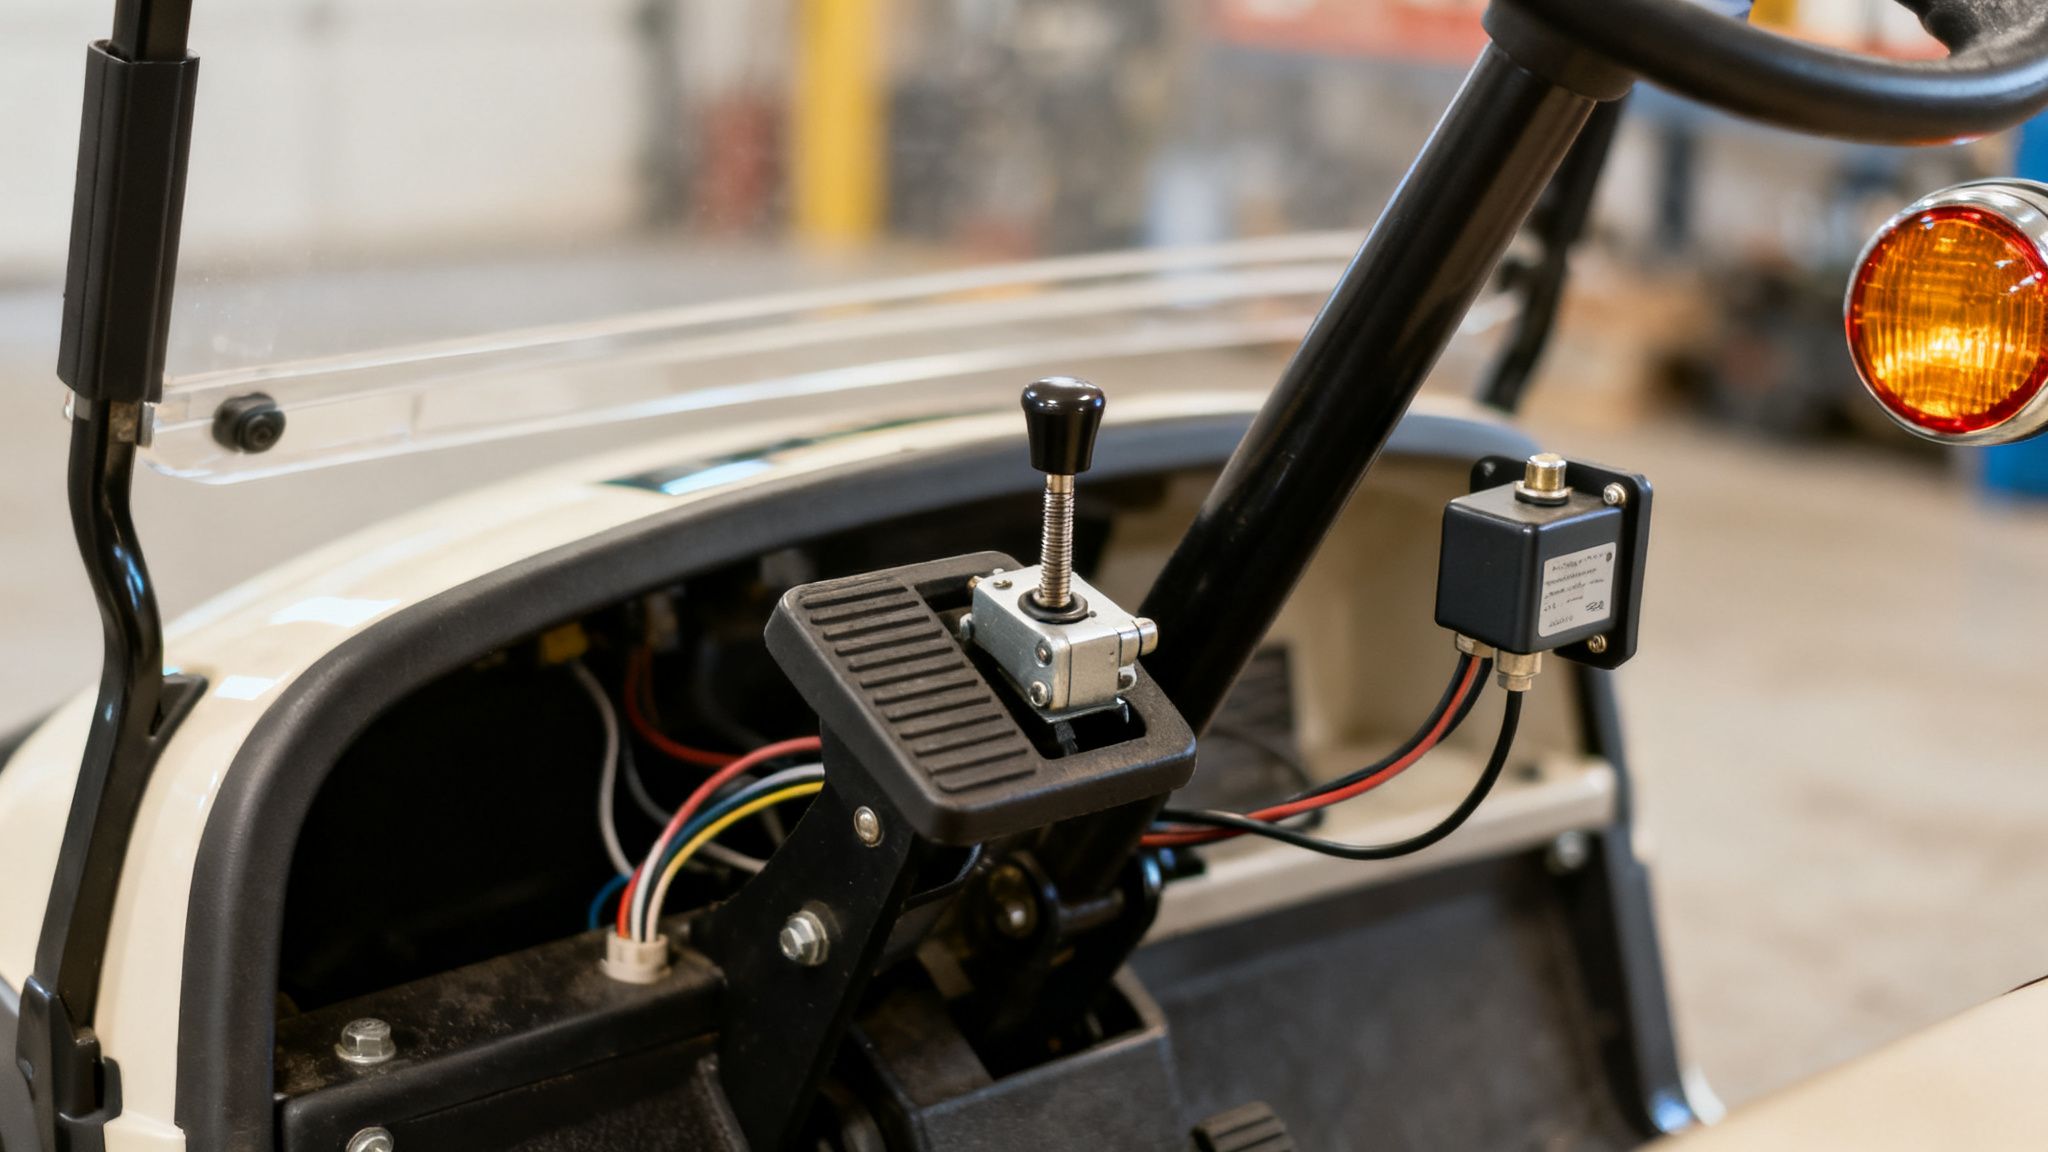
First things first, you have to find the switch. It's almost always tucked away right by the brake pedal assembly. What you're looking for is a small component, usually with a plunger, that has a couple of wires attached. Go ahead and press the brake pedal—you should see it make physical contact with the switch, either pushing its button in or letting it pop out.
Start with a Visual Checkup
Before you even think about grabbing a multimeter, just use your eyes. I’ve seen my fair share of problems that were glaringly obvious once you knew what to look for. A quick visual inspection can often pinpoint the issue without any fancy tools.
Here’s what I always check for:
- Physical Damage: Is the plastic housing cracked? Does the plunger look bent, or is it stuck in one position? Any visible damage is an immediate red flag.
- Loose Wires: Give the wires connected to the switch a gentle tug. It’s not uncommon for a connector to work itself loose over time, causing an intermittent or dead circuit.
- Corrosion: Look closely at the metal terminals. Any sign of rust or that classic greenish-white powdery buildup means you've got a bad connection.
- Obstructions: You’d be surprised what can get kicked up under there. A small rock, a clump of dried mud, or other debris can easily get in the way and prevent the pedal from properly activating the switch.
If everything looks solid, clean, and connected, it’s time to confirm the switch's internal health. This is where your multimeter comes in. For a broader look at tackling these kinds of electrical gremlins, our guide on troubleshooting electric golf cart problems is a great resource.
The Multimeter Continuity Test
This is the moment of truth. A continuity test is a simple but definitive way to see if an electrical path is open or closed. It will tell you with certainty whether your switch is functioning correctly or has failed internally.
Here’s how you do it:
- Turn your multimeter dial to the continuity setting. It’s usually marked with a symbol that looks like a sound wave or diode (->|-). Touch the two probes together to make sure it beeps—that’s your confirmation it’s working.
- Carefully disconnect the two wires from the brake light switch terminals.
- Now, touch one probe to each of the two terminals on the switch itself.
With the probes held firmly in place, you’ll run two simple tests. First, with the brake pedal not pressed (its resting state), the meter should stay silent. This indicates an open circuit, which is exactly what you want.
Next, have a helper press and hold the brake pedal down. The instant they do, your multimeter should let out a steady beep. That sound confirms the circuit is now closed, and electricity can flow. The switch is doing its job.
Expert Insight: If your meter beeps when the pedal isn't being touched, or stays silent when it's pressed to the floor, you've found your problem. The switch is bad. It’s a simple, foolproof test that takes all the guesswork out of the diagnosis.
It’s easy to overlook these small parts, but they play a critical role. In fact, the global market for brake light switches was valued at a whopping $1,377.09 million back in 2021. With the rise of all vehicles, including premium EVs like the Solana XA and Campus E models, that number is expected to climb past $1,732 million by 2025. You can see more data on this growing market over at cognitivemarketresearch.com.
A Practical Walkthrough for Replacing and Adjusting the Switch
Alright, you've diagnosed a bad switch. Now for the satisfying part: swapping it out and getting your brake lights working perfectly again. This is a pretty straightforward job on a Solana EV, but patience and a little attention to detail will make sure this fix is a permanent one.
Let's start by getting the old switch out. The first thing to do is unplug the wiring harness. Look for a plastic connector, usually with a little locking tab you can press. Give that tab a firm but gentle squeeze and pull the two halves apart. A word of caution from experience: never, ever yank on the wires themselves. That’s a surefire way to create a much bigger, more frustrating electrical problem.
Once it's unplugged, you can unbolt the switch itself. It's typically held on its threaded body by one or two mounting nuts. Just grab a wrench or a socket and loosen them up. The old switch should slide right out of its mounting bracket. Hang onto those nuts and any washers—you'll need them in a minute.
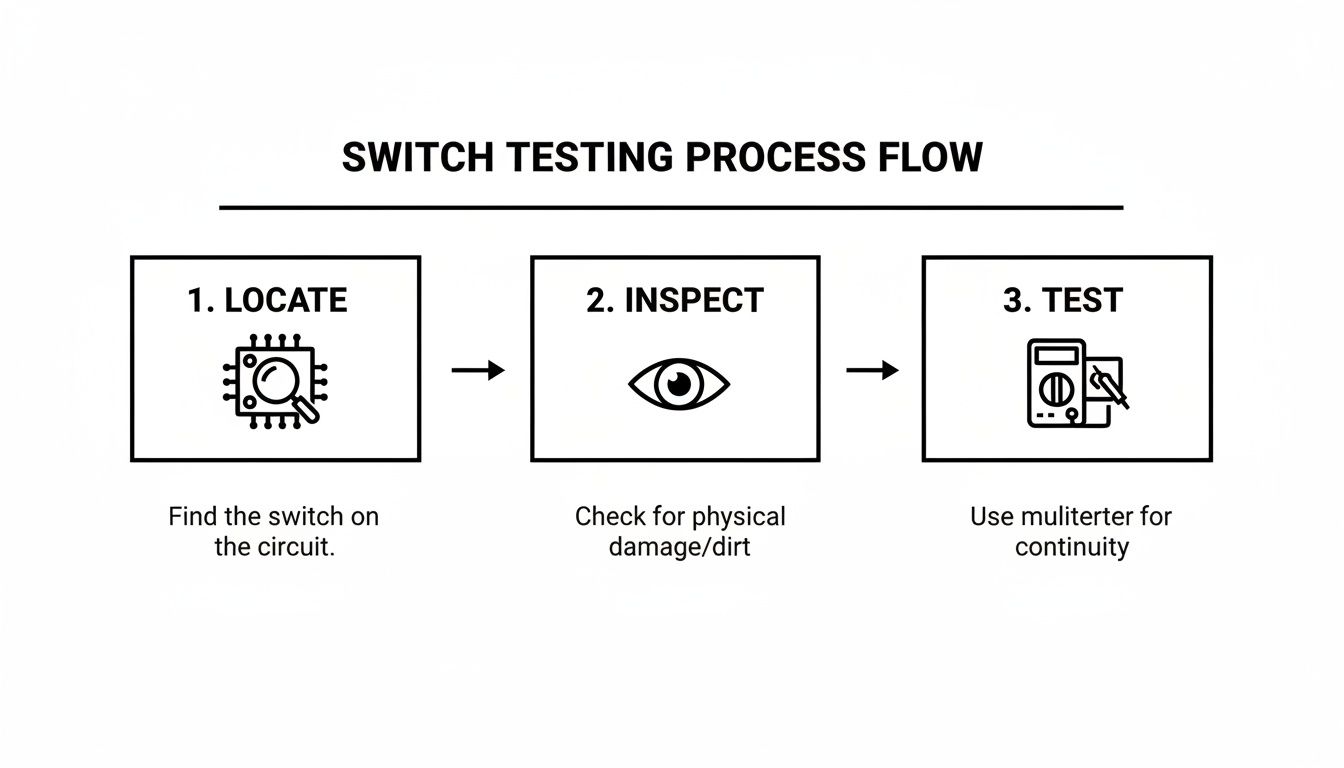
As you can see, a simple process of locating, inspecting, and testing is always the best way to confirm the switch is the culprit before you go through the trouble of replacing it.
Installing the New Switch
Time to put in the new part. Go ahead and slide your new golf cart brake light switch into the same bracket the old one came out of. Thread the mounting nuts back on, but only make them finger-tight for now. You want it held in place, but loose enough to adjust. This is key, as we'll get to the adjustment in a moment.
Next, plug the wiring harness into the new switch. You should feel a satisfying "click" as the connector locks home. That solid connection is absolutely essential for the switch to work reliably.
Pro Tip: Before you connect the new switch, take a good look at the terminals inside the cart's wiring harness connector. If you spot any green fuzz (corrosion) or bent-out-of-shape contacts, give it a quick shot of electrical contact cleaner. This little step ensures you're getting the best possible connection.
The Art of Proper Adjustment
Getting the new switch installed is only half the job. The real craft is in the adjustment. If you get this wrong, your brake lights might stay on all the time, or worse, they won't come on until you're mashing the pedal to the floor. Both are obvious safety hazards.
Your goal is simple: the brake lights should pop on the very moment you start pressing the pedal. You want to eliminate any "dead space" or delay.
Here’s my go-to method for nailing the adjustment:
- Make sure those mounting nuts are still a bit loose.
- Grab a friend to stand behind the cart and be your spotter.
- Slowly turn the switch, threading it either in or out of its bracket. This moves the plunger closer to or farther from the brake pedal assembly.
- With your hand, gently press the brake pedal. Have your spotter yell out the second the lights come on.
- Fine-tune the switch's position until the lights activate with just a quarter-inch to a half-inch of pedal travel. That's the sweet spot.
- Once you've found it, carefully tighten down the mounting nuts to lock the switch in place. Be careful not to let the switch rotate as you tighten it.
This final adjustment is what ensures your Solana EV is clearly and instantly telling other drivers what you're doing. A new switch might run you between $80 and $180, but the peace of mind that comes from knowing it’s adjusted correctly is priceless. It's a small investment that pays off every single time you tap the brakes.
Why Using OEM Parts for Your Solana EV Matters
When it’s time to replace a part on your Solana EV, like the brake light switch, you’ll run into a classic choice: go with an Original Equipment Manufacturer (OEM) part or save a few bucks on an aftermarket one. While the lower price tag on a generic part might catch your eye, it's often a false economy. Sticking with OEM is really about protecting your investment and keeping your cart running exactly the way it was designed to.
Think of it this way: an OEM golf cart brake light switch isn't just like the one that came with your cart—it is the one. It's built to the exact specifications for your model, whether you're driving a Solana XA, a rugged Solana F, or a Campus E. This means you're getting a perfect fit, the right electrical specs, and seamless operation with all the other components on your cart.
The Problem with Aftermarket Parts
Aftermarket parts are a different story. They're made by third-party companies trying to create a single part that fits a whole bunch of different vehicles, not just your specific Solana. That "one-size-fits-all" mentality almost always involves cutting corners somewhere.
- Imperfect Fit: A switch that's even a millimeter off might not mount securely. This can lead to it not working when you need it most or just wearing out way too fast.
- Material Quality: Solana EV specifies materials that are tested for durability and can handle the bumps, vibrations, and weather a golf cart goes through. Aftermarket suppliers often use cheaper materials that just don't hold up over time.
- Warranty Risks: Here's a big one—installing a non-OEM part could actually void your vehicle's warranty. Suddenly, that small, cheap repair could put you on the hook for a much more expensive problem down the road.
The bottom line is simple. An OEM part brings your Solana EV back to its original factory condition. An aftermarket part introduces unknowns that can affect safety and performance, making it a gamble that just isn't worth taking.
Sourcing the Right Part for Your Cart
Finding the right OEM part is actually pretty easy if you know where to look. Your best bet is always to contact a certified Solana EV dealer. They have the official parts catalog right at their fingertips and can guarantee you get the exact component you need.
To make it a quick and painless process, have your cart’s Vehicle Identification Number (VIN) handy when you call or visit. That number is the key to everything; it lets the dealer pull up the precise part number for your specific model and year. You can also look into verified electric vehicle parts suppliers that carry genuine components.
The demand for these critical safety parts is growing fast. The brake light switch market is projected to hit $684 million by 2033, and that growth is fueled by the same EV boom that has pushed the electric golf cart industry to a $1,127.09 million valuation in 2024. For a premium brand like Solana EV, this growth is all about a reputation for rock-solid reliability—which is exactly why sticking with factory-spec parts is so crucial. You can dive deeper into these market growth insights on datainsightsmarket.com.
Brake Light Switch Questions We Hear All the Time
Even with a good guide in front of you, questions are bound to come up. It's totally normal, especially when you're dealing with something as crucial as your cart's brakes. Here are some of the most common questions we get from Solana EV owners, along with straightforward answers to get you back on the road.
Is It Okay to Use a Universal Brake Light Switch on My Solana EV?
This one comes up a lot, usually because a generic part is easy to find and cheap. While grabbing a universal golf cart brake light switch might seem like a quick fix, we strongly advise against it for a high-performance, street-legal vehicle like a Solana EV. Honestly, it's a perfect example of getting what you pay for.
The OEM parts are designed specifically for the electrical and mechanical tolerances of your cart. A generic switch might not trigger at the right pedal pressure, which can mean your brake lights either come on too late or stay on all the time. Using a part that's not up to spec can also create electrical issues that might damage other components or even void your warranty. The bottom line? Stick with a genuine Solana EV part. It guarantees a perfect fit and, more importantly, keeps you safe.
Think of it this way: a study on Volkswagen EPC lights found they are often triggered by a bad brake light switch. This shows how a seemingly small part can send bad signals to the vehicle's main computer, messing with everything from acceleration to stability control.
My Brake Lights Are Stuck On. Is It Always the Switch?
Brake lights that won't turn off are a classic sign of a bad switch, and nine times out of ten, that's exactly what it is. But it's not the only possibility, so it's smart to check a few other things before you buy a replacement.
Here’s what could be going on:
- The Switch is Bad: The switch itself could be jammed internally, stuck in the "on" position. This is the most common culprit.
- It's Out of Adjustment: The switch might be set too tight, so the brake pedal keeps it pressed down even when your foot is off it.
- Something's Wrong with the Pedal: The brake pedal itself might not be returning all the way up. This could be due to a weak return spring or something physically blocking it.
- A Short in the Wires: It's less common, but a short circuit in the wiring could be keeping the lights on by bypassing the switch entirely.
The best way to figure it out is to follow the diagnostic steps we covered earlier. Putting a multimeter on the switch to test for continuity will tell you for sure if it’s the problem before you go chasing down more complicated issues.
How Often Should I Check the Brake Light Switch?
A little preventative maintenance goes a long way. You should really make a quick visual check of your brake lights part of your routine every single time you head out. It just takes a second to have someone look while you press the pedal.
As for a proper hands-on inspection of the switch, once a year is a pretty solid rule. That's a great time to pop the hood and look for any corrosion, check for loose wires, or see any signs of physical damage. If you're running a commercial fleet at a resort or on a big campus where the carts get a ton of daily use, you'll want to be more proactive. We suggest checking them every three to six months to stay ahead of any problems and keep everyone safe.
At Solana EV, we want our owners to have the know-how to keep their vehicles running perfectly and safely. For authentic OEM parts and professional advice, you can always visit us at https://solanaev.com.