So, you've got a gas-powered golf cart and you're thinking about going electric. A conversion kit seems like the perfect solution, right? These kits bundle together all the core components you need—the motor, controller, wiring, and hardware—to ditch the gas engine for clean, quiet electric power.
It’s a fantastic project for the right person. You get to modernize an older cart, eliminate fumes and noise, and enjoy that smooth, instant torque that only electric motors can provide.
Is a DIY Conversion Kit Really Your Best Move?
Jumping into a DIY golf cart conversion is a big undertaking. It's an incredibly rewarding project, but let's be honest, it’s not for everyone. The dream of giving your old gas-guzzler a new lease on life is powerful, promising the satisfaction of a custom build and saving cash on fuel and upkeep down the road. But before you get carried away, you need to have a frank conversation with yourself about your skills, your time, and your budget.
This isn't your average weekend project. A successful conversion means you're comfortable getting your hands dirty. You'll need a decent workspace, a solid set of tools, and a good dose of patience to tackle both the mechanical and electrical sides of the job. Before you even click "add to cart" on a golf cart conversion kit, take a moment to decide if you're truly up for the challenge.
Why Go the DIY Route?
For most folks, it boils down to one word: customization. When you build it yourself, you control everything. You can spec it out for massive torque to climb the steepest hills in your neighborhood or tune it for top speed to cover your property in record time. You get to hand-pick every critical part, from the motor and controller right down to the specific battery chemistry that fits your needs.
The other huge draw is the potential cost savings. If you already have a gas cart with a solid frame, converting it can be much easier on the wallet than buying a brand-new electric cart. You’re essentially just giving the most durable part of the vehicle—the chassis—a modern powertrain transplant.
My Takeaway: The DIY path gives you total control over how your cart performs and what features it has. It’s your chance to build a one-of-a-kind electric vehicle for potentially much less than a new model, as long as you have the skills and time to see it through.
This trend isn't just happening in the golf cart world. The entire automotive conversion kit market was valued at an impressive USD 4,320.4 million in 2025 and is expected to hit USD 7,379.9 million by 2035. That's a clear signal that more and more people are choosing to upgrade what they have instead of buying new. You can see how the automotive conversion industry is growing for yourself.
A Realistic Look at Your Options
To make the right call, you need to weigh the pros and cons of the three main paths: the DIY kit, hiring a professional to do the conversion, or just buying a new, purpose-built electric cart like a Solana EV. Each one has its own set of trade-offs when it comes to cost, time, and the final product.
Think about what matters most to you:
- Total Cost: A DIY kit has the lowest upfront cost for parts, but don't forget to budget for any tools you might need to buy. A professional conversion adds labor to the bill, while a new EV is the biggest initial hit to your bank account but comes with a full warranty.
- Time Commitment: A DIY project could easily eat up several weekends, maybe more, depending on your experience level. A pro shop can turn it around much faster, and buying new is, of course, instant gratification.
- Customization vs. Warranty: The DIY route gives you ultimate freedom but zero warranty on your own work. A new vehicle has limited customization options but is backed by comprehensive manufacturer support.
Let's break down how these choices stack up side-by-side.
DIY Kit vs Pro Conversion vs New Electric Cart
Making the right choice really comes down to what you value most. This table lays out the key differences in cost, time, and your ability to create a truly custom cart.
| Factor | DIY Conversion Kit | Professional Conversion Service | New Purpose-Built EV |
|---|---|---|---|
| Total Cost | Lowest initial parts cost, potential tool expenses. | Moderate to high, includes parts and labor. | Highest upfront investment. |
| Time Commitment | High (several weekends or more). | Low (typically a few days). | None (drive it off the lot). |
| Customization | Highest level of control over every component. | Limited to what the service provider offers. | Limited to factory options and accessories. |
| Warranty & Support | Warranty on parts only; no labor support. | Varies by provider; may offer a limited warranty. | Comprehensive manufacturer warranty. |
So, what's the verdict? If you love hands-on projects and want complete control over the outcome, a golf cart conversion kit is a fantastic choice. If you want a custom electric cart but don't have the time or skills for the work, letting a professional handle it is the way to go. But if what you really want is a modern, hassle-free vehicle with a full warranty from day one, investing in a new purpose-built EV is probably your simplest and best bet.
How to Choose the Right Conversion Kit
Picking the perfect golf cart conversion kit is easily the most critical decision you'll make for this whole project. This isn't just about buying a box of parts; it's about matching components that work together seamlessly to give you the performance you're after. Get it right, and the kit will feel like it was designed for your cart from the factory. Get it wrong, and you're in for a long road of frustration, poor performance, and wasted money.
This choice single-handedly dictates your cart's speed, torque, range, and overall reliability. Let's walk through the key factors to make sure you build a cart that truly fits your needs, whether you're just cruising the neighborhood or need to haul heavy loads up steep hills.
Match the Kit to Your Cart Model
First things first: compatibility is non-negotiable. You can't just grab any kit and hope it fits. The big names—Club Car, EZGO, and Yamaha—all have their own unique chassis designs, motor mounts, and even different splines on their axles. Any reputable kit supplier will ask for your cart's make, model, and year right up front to make sure you get the right hardware.
Think about it this way: a motor built for a Club Car DS won't just bolt onto an EZGO TXT frame without some serious, and probably unwise, modifications. Trying to force-fit parts is a recipe for disaster. You’ll run into alignment issues that can chew up your motor or differential in no time.
A well-designed kit should feel like an OEM upgrade, not a universal puzzle piece. Always start by confirming that the kit you're considering is specifically engineered for your cart's chassis. This simple step prevents the biggest and most expensive headaches.
Decoding Motors and Controllers
The motor and controller are the heart and soul of your electric powertrain. They define how your cart feels and performs, so it’s crucial to understand what you're looking at.
- AC (Alternating Current) Motors: These are the new standard for a good reason. They're more efficient, pack more of a punch, and are practically maintenance-free because they don't have brushes that wear out. An AC motor gives you incredible torque for climbing hills and can really open up your top speed.
- DC (Direct Current) Motors: The more traditional, and often budget-friendly, choice. DC motors have a simpler design and can still provide plenty of power, but they're generally less efficient than their AC counterparts and will need their brushes replaced eventually.
The controller is the brain of the operation, telling the motor what to do. Its amperage rating is a direct measure of its power output. A 300-400 amp controller is perfectly fine for cruising on flat ground. But if you live in a hilly area or plan on loading up the cart with people and gear, you’ll want a 500-600 amp controller to deliver the torque you need without overheating.
Choosing Your Voltage System
Voltage is basically the horsepower rating for your electric system. More voltage means more potential for power and speed. The two most common setups you'll see in conversions are 48V and 72V.
A 48V system is the sweet spot for most people. It delivers a serious performance jump over old 36V systems and will get most carts up to a comfortable 20-25 mph. It’s a great balance of power, range, and cost.
If you’re a performance junkie, a 72V system is what you’re after. This setup delivers exhilarating acceleration and can push top speeds past 30 mph. Just be aware that it comes with a higher price tag for both the kit and the batteries. It's really best for carts that also have upgraded brakes and suspension to safely handle all that extra power.
The Great Battery Debate: Lead-Acid vs. Lithium
Your battery choice is arguably just as important as your motor. This decision will determine your cart's range, its total weight, and how much time you spend on maintenance. Here, you'll need to find the right balance between your budget and your performance goals.
This has become a major talking point as the electric golf cart market continues to explode. The American market alone is expected to jump from USD 529.4 million in 2024 to USD 886.7 million by 2033, and a huge part of that growth comes from battery breakthroughs.
So, what are your options? It really boils down to two choices.
Comparing Lead-Acid and Lithium-Ion Batteries
Here's a straightforward look at how the two main battery types stack up against each other. Each has its place, but the differences in performance, upkeep, and long-term value are significant.
| Feature | Lead-Acid Batteries | Lithium-Ion (LiFePO4) Batteries |
|---|---|---|
| Initial Cost | Lower upfront investment. | Significantly higher upfront cost. |
| Weight | Very heavy (300-400 lbs). | Lightweight (around 100 lbs). |
| Lifespan | Shorter (3-5 years). | Much longer (8-10+ years). |
| Maintenance | Requires regular watering and cleaning. | Virtually maintenance-free. |
| Performance | Voltage sags under load, reducing power. | Maintains consistent voltage and power. |
While it's tempting to save money upfront with lead-acid, lithium batteries almost always offer a lower total cost of ownership. They are dramatically lighter, last far longer, and deliver superior, consistent power from a full charge down to empty.
For a much deeper dive, take a look at our guide on lithium vs lead-acid golf cart batteries to help you lock in your final decision.
Getting Your Hands Dirty: The Installation Process
Alright, you’ve got your golf cart conversion kit in hand. Now comes the fun part—turning that box of components into a fully electric ride. This is where the project really comes to life. We’ll break it down into a few manageable phases: yanking out the old gas parts, mounting the new hardware, and then wiring it all up. Taking it one step at a time is the key to a clean, successful build.
Before you even think about touching a wrench, get your workspace organized. Good lighting is a must, and trust me on this, you'll want magnetic trays or at least a few labeled coffee cans for all the nuts and bolts. A little prep now will save you from a massive headache later when you're crawling around looking for that one specific fastener you tossed aside.
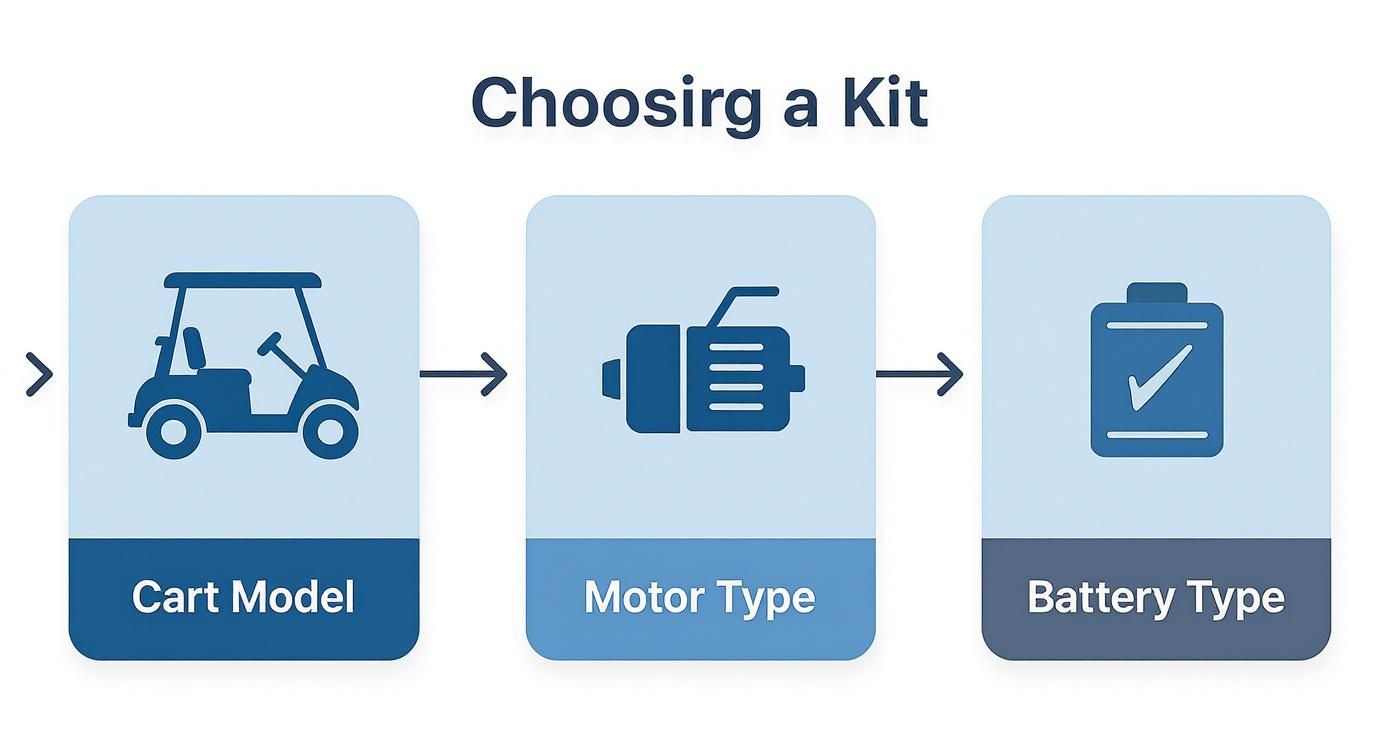
This visual is a great reminder of how each decision—cart model, motor, and batteries—sets the stage for the installation ahead.
Ripping Out the Old Gas Powertrain
First up is getting rid of the old internal combustion engine. Let’s be honest, this is the messiest part of the whole job. Have plenty of shop rags, some good degreaser, and a safe way to dispose of old oil and gasoline.
Kick things off by disconnecting the battery. Then, carefully drain the fuel into an approved container. From there, you can start unhooking fuel lines, the throttle cable, and the choke. Here’s a pro tip: use masking tape and a marker to label every single wire you disconnect. Even if you think you won’t need it again, label it. It’s a habit that pays off.
With everything disconnected, it’s time to unbolt and pull the big stuff:
- The Engine: This is the heavy one. An engine hoist is ideal, but a strong friend will also do the trick. Don't try to manhandle it alone.
- The Fuel Tank: Once it's empty, this part is pretty straightforward to remove.
- The Exhaust System: Expect this to be rusty and stubborn. A little penetrating oil sprayed on the bolts ahead of time will be your best friend.
After the old powertrain is out, seize the opportunity to give the engine bay a serious cleaning. A clean slate not only makes the new installation more pleasant but also helps you spot any potential issues with the cart’s frame.
Mounting the New Electric Hardware
Now for the satisfying part: bolting in the heart of your new EV system. Most kits come with a motor adapter plate, which is designed to let your new electric motor mount right up to the cart’s existing differential.
Alignment is everything here. When you mount that motor, it has to sit perfectly flush against the adapter, with the motor shaft lined up precisely with the differential’s input. If it’s even slightly off, you’ll get nasty vibrations and risk wrecking the motor bearings or differential gears. Hand-tighten the bolts first, double-check the alignment from a few different angles, and then torque them down to spec.
Next, you need to find a home for the controller and solenoid. You're looking for a spot that's shielded from water but still gets some airflow for cooling. The frame rails inside the old engine bay are usually a prime location.
My Advice: Don't bolt the controller down tight just yet. Figure out its position, drill your holes, but just use a bolt or two to hang it loosely. This gives you some much-needed wiggle room when you start wrestling with those thick, stiff power cables.
Tackling the Electrical System and Wiring
With the big pieces in place, it’s time to wire it all together. This can look intimidating, but a quality golf cart conversion kit will have a detailed wiring diagram. Follow it to the letter.
The most critical wires are the heavy-duty cables connecting the batteries, controller, solenoid, and motor. These should be thick (2 or 4 gauge is typical) and as short as you can reasonably make them to reduce power loss. Every connection needs to be spotless and tight. A loose connection in this high-amperage circuit can generate a scary amount of heat, potentially melting terminals and creating a fire risk.
You're dealing with a significant electrical load, and the principles aren't that different from high-power home wiring. If you're new to this, it’s worth reading through an expert guide to high-power electrical installations to really appreciate the safety and precision involved.
The controller is the brain of the operation, and knowing how it works is key. To get a better handle on this, take a look at our guide explaining how a golf cart controller functions and why it's so vital for your cart's performance.
Your next step is connecting the throttle. Most kits use a potentiometer (often called a "pot box") that reads how far you press the accelerator and sends that signal to the controller. This involves connecting a few small, low-voltage wires. Pay very close attention to the diagram here—mixing these up can fry your controller.
Finally, you’ll wire up the solenoid. Think of it as a heavy-duty switch. It uses a low-power signal from your key and accelerator to close the main circuit, sending the big amps to the controller. It's a safety feature that ensures the motor only gets power when you want it to.
The First Power-Up and Initial Test Drive
This is it—the moment of truth. After all the hours spent wrenching and wiring, your cart is finally ready to come to life as an EV. It's easily the most exciting part of the project, but it’s also where you need to be the most careful. A slow, methodical approach here is non-negotiable; it's the only way to prevent damage and ensure that first ride is a safe one.
Before you even think about connecting that main battery cable, channel your inner pilot and do a thorough pre-flight check. Get your wiring diagram out and grab a multimeter. You're going to go over every single connection one last time.
Is the positive lead really going to the positive terminal? Is every lug cinched down tight? A loose connection on a high-amperage cable isn't just a performance issue—it's a major fire hazard.
Crucial Safety Tip: Before connecting the main battery pack, use your multimeter to check for continuity between the controller's main positive and negative terminals. If it beeps, you have a dead short somewhere. You absolutely must find and fix it before introducing power to the system.
Making the Final Connection Safely
With your pre-flight check complete, it’s time to energize the system. The goal is to avoid a big, startling spark that can fry the capacitors inside your expensive new controller. While most modern controllers have a built-in pre-charge resistor to manage this, it's still best practice to be deliberate.
Connect every other battery lead first, saving the main negative terminal for the very last step. When you're ready, make a firm, confident connection of the final negative cable to its battery post. A tiny, brief spark is normal—that's just the capacitors charging. However, if you get a loud POP and a big flash, disconnect immediately and go back to hunting for that short circuit.
The Controlled First Test Drive
Okay, the power is on. Don't go peeling out of the garage just yet. Your first test drive needs to happen in a safe, open area, far from traffic and obstacles. The mission right now isn't to test top speed; it's to confirm basic functionality.
Start with the cart on jack stands so the wheels can spin freely. Turn the key, shift into forward, and gently press the accelerator. The wheels should start to spin smoothly. Listen intently for any unusual noises—grinding, high-pitched whines, or clicking from the motor or differential are all red flags.
With the cart still in the air, run through these quick checks:
- Directional Switch: Make sure "forward" spins the wheels forward and "reverse" spins them backward. This is also a good time to check that your reverse buzzer is working, if you have one.
- Throttle Response: Does the wheel speed increase smoothly as you press the pedal? If it's jerky or stutters, you might have a bad throttle signal or a loose connection.
- Check for Heat: Let it run for about a minute, then shut it down. Carefully feel the motor and controller. They might be a little warm to the touch, which is fine. If they're too hot to keep your hand on, you have a problem that needs immediate attention.
If everything checks out on the jack stands, you can lower the cart for its first roll on the ground. Keep it slow and short. Pay attention to how the cart accelerates and brakes. Listen for any new sounds that appear under load. This careful, step-by-step process is what separates a successful conversion from a frustrating one, ensuring your new EV is reliable and safe right from the start.
Troubleshooting Common Conversion Issues
Even the most meticulous installation can hit a snag. It’s just part of the DIY process. The real trick is to stay calm and think through the problem logically instead of letting frustration take over.
So, you've finished the conversion, but the cart isn't cooperating. Don't worry. We'll walk through the most common symptoms and how to diagnose them, helping you pinpoint the real issue and get you on the road.
The Cart Won't Move At All
This is probably the most common—and heart-stopping—problem. You turn the key, press the pedal, and get… nothing. No click, no hum, just dead silence. Before you panic, know that this is almost always a simple wiring mistake or a component not getting power.
The best way to tackle this is to trace the power from the source forward. This systematic approach keeps you from chasing ghosts in the machine.
- Start with the Battery Pack: Is it actually charged? It sounds obvious, but you’d be surprised. Grab a multimeter and confirm you’re getting the right voltage across the main terminals (around 51V for a 48V pack).
- Listen for the Solenoid Click: When you press the accelerator, you should hear a solid "click" from the solenoid. If it's silent, the solenoid isn't activating. This could mean it's not getting the signal from the key switch and pedal, or the solenoid itself might be faulty.
- Confirm Controller Power: With your multimeter, check for full pack voltage at the controller's main B+ and B- terminals. If the power is making it this far, you know the controller is at least receiving the energy it needs.
If you’ve run through these basics and are still stumped, our comprehensive guide on https://solanaev.com/troubleshooting-electric-golf-cart-problems/ has a much deeper checklist that can help you isolate the problem.
Stuttering or Jerky Acceleration
Another classic symptom is a cart that moves but feels all wrong—it might hesitate when you first press the pedal, stutter as you accelerate, or surge unpredictably. This almost always points to a problem with the throttle signal or a bad high-amperage connection.
The controller relies on a clean, smooth signal from your accelerator to deliver power evenly. If that signal is jumpy, the ride will be, too.
Pro Tip: A common culprit for stuttering is a loose connection on one of the main power cables. When you put the system under load, a poorly tightened lug can arc, causing a momentary power drop. Disconnect the main battery negative, then go back and re-check every single high-current connection: battery terminals, solenoid, controller, and motor.
Cart Runs Slower Than Expected
What if the cart runs smoothly but just doesn't have the get-up-and-go you were hoping for? This can be a more nuanced issue. The root cause could be anything from controller programming to an undersized component or a battery pack that isn't up to the task.
First, make sure your battery pack can deliver the amperage your new system demands. A pack that sags too much under load will kill your performance. It's a huge investment—the golf cart battery market was valued at USD 137 million in 2025 and is projected to hit USD 220.1 million by 2034 for a reason.
If the batteries check out, look at your controller settings (if it's a programmable model). Many controllers have built-in limits for top speed or amperage that might need adjusting for your specific setup.
Finally, don't forget the simple stuff. Are the tires properly inflated? Are the brakes dragging even slightly? Basic mechanical resistance is a notorious performance thief. For a wider perspective on diagnostics, you can find helpful general troubleshooting and maintenance advice for automated systems that often apply here, too.
Answers to Your Top Conversion Questions
Even with all the steps laid out, it's completely normal to have a few questions swirling around before you pull the trigger on a golf cart conversion kit. This is a real project, a genuine investment of your time and money, so let's clear up some of the most common things people ask.
What Does a Golf Cart Conversion Kit Typically Cost?
The final bill for one of these projects can swing quite a bit. If you’re just looking for a basic setup, a simple DC motor kit running on old-school lead-acid batteries could get you started for around $1,500.
But if you have high-performance aspirations, you'll be looking at a more powerful AC kit matched with a high-capacity lithium battery pack. That combination can easily take your total cost north of $5,000.
Honestly, your choice of battery is the biggest factor here. The decision between lead-acid and lithium will move the needle on your budget more than anything else.
How Much Faster Will My Cart Be After Conversion?
The new top speed really comes down to the parts you pick. A standard 48V system is usually enough to get a cart into the 20-25 mph range, which feels like a huge jump if you're coming from an old, tired gas model.
For the real speed demons out there, some of the high-performance kits with 72V systems can push a cart past 30 mph. Just keep in mind, that kind of power puts a lot of stress on the rest of the cart. You need to be absolutely sure your brakes, suspension, and tires are in top-notch shape to handle that kind of performance safely.
Key Takeaway: Your final speed is a cocktail of motor, controller, and voltage. Pushing for more power means you have to upgrade the supporting components to keep things safe on the road.
Can I Make My Converted Cart Street Legal?
Getting your newly converted cart street legal is definitely possible, but it’s a process that hinges entirely on your local and state laws. To get it registered as a Low-Speed Vehicle (LSV), you'll almost certainly need to add a whole host of safety features.
You can pretty much count on needing:
- Headlights, taillights, and turn signals
- A horn and rearview mirrors
- A proper windshield (often automotive safety glass is required)
- Seatbelts for every passenger
The most important thing you can do is research your specific city and state regulations before you start. Don't make any assumptions. A quick call or visit to your local DMV or city hall will give you the official checklist and save you a massive headache later.
Instead of spending your weekends covered in grease and wrestling with wiring diagrams, you could be driving a vehicle engineered from the ground up for performance. Solana EV offers a full lineup of purpose-built, street-legal electric vehicles that give you incredible style, power, and reliability—all backed by a full warranty. See what the future of personal transport looks like at https://solanaev.com.